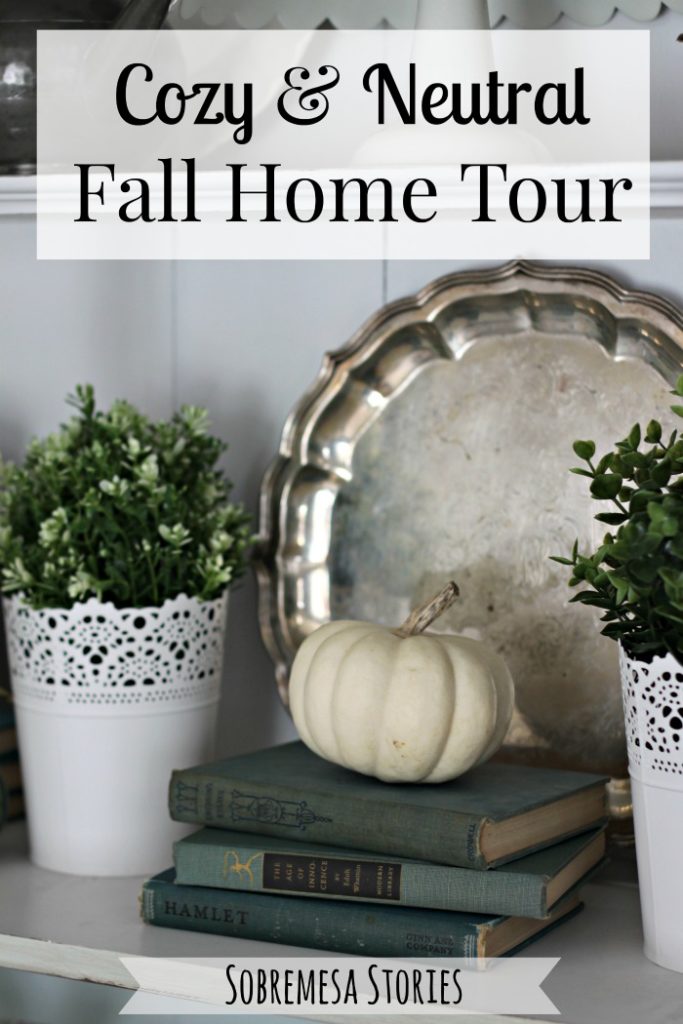
UPDATE: Make sure to check out our 2016 cozy and neutral fall home tour to see this wreath and the other fun touches I added to give our house some autumn spirit!
This is our first year in an actual house (you can check out the tour of our home here!) and I’m so excited to start creating some decorations that we can hopefully use in our home for years to come. The decorations my mom used to put up for each holiday are such a big part of my childhood memories of those holidays and I want to create some of those same traditions for our kiddos (even if the first one is still in my belly and unable to appreciate our awesome fall decorations quite yet).
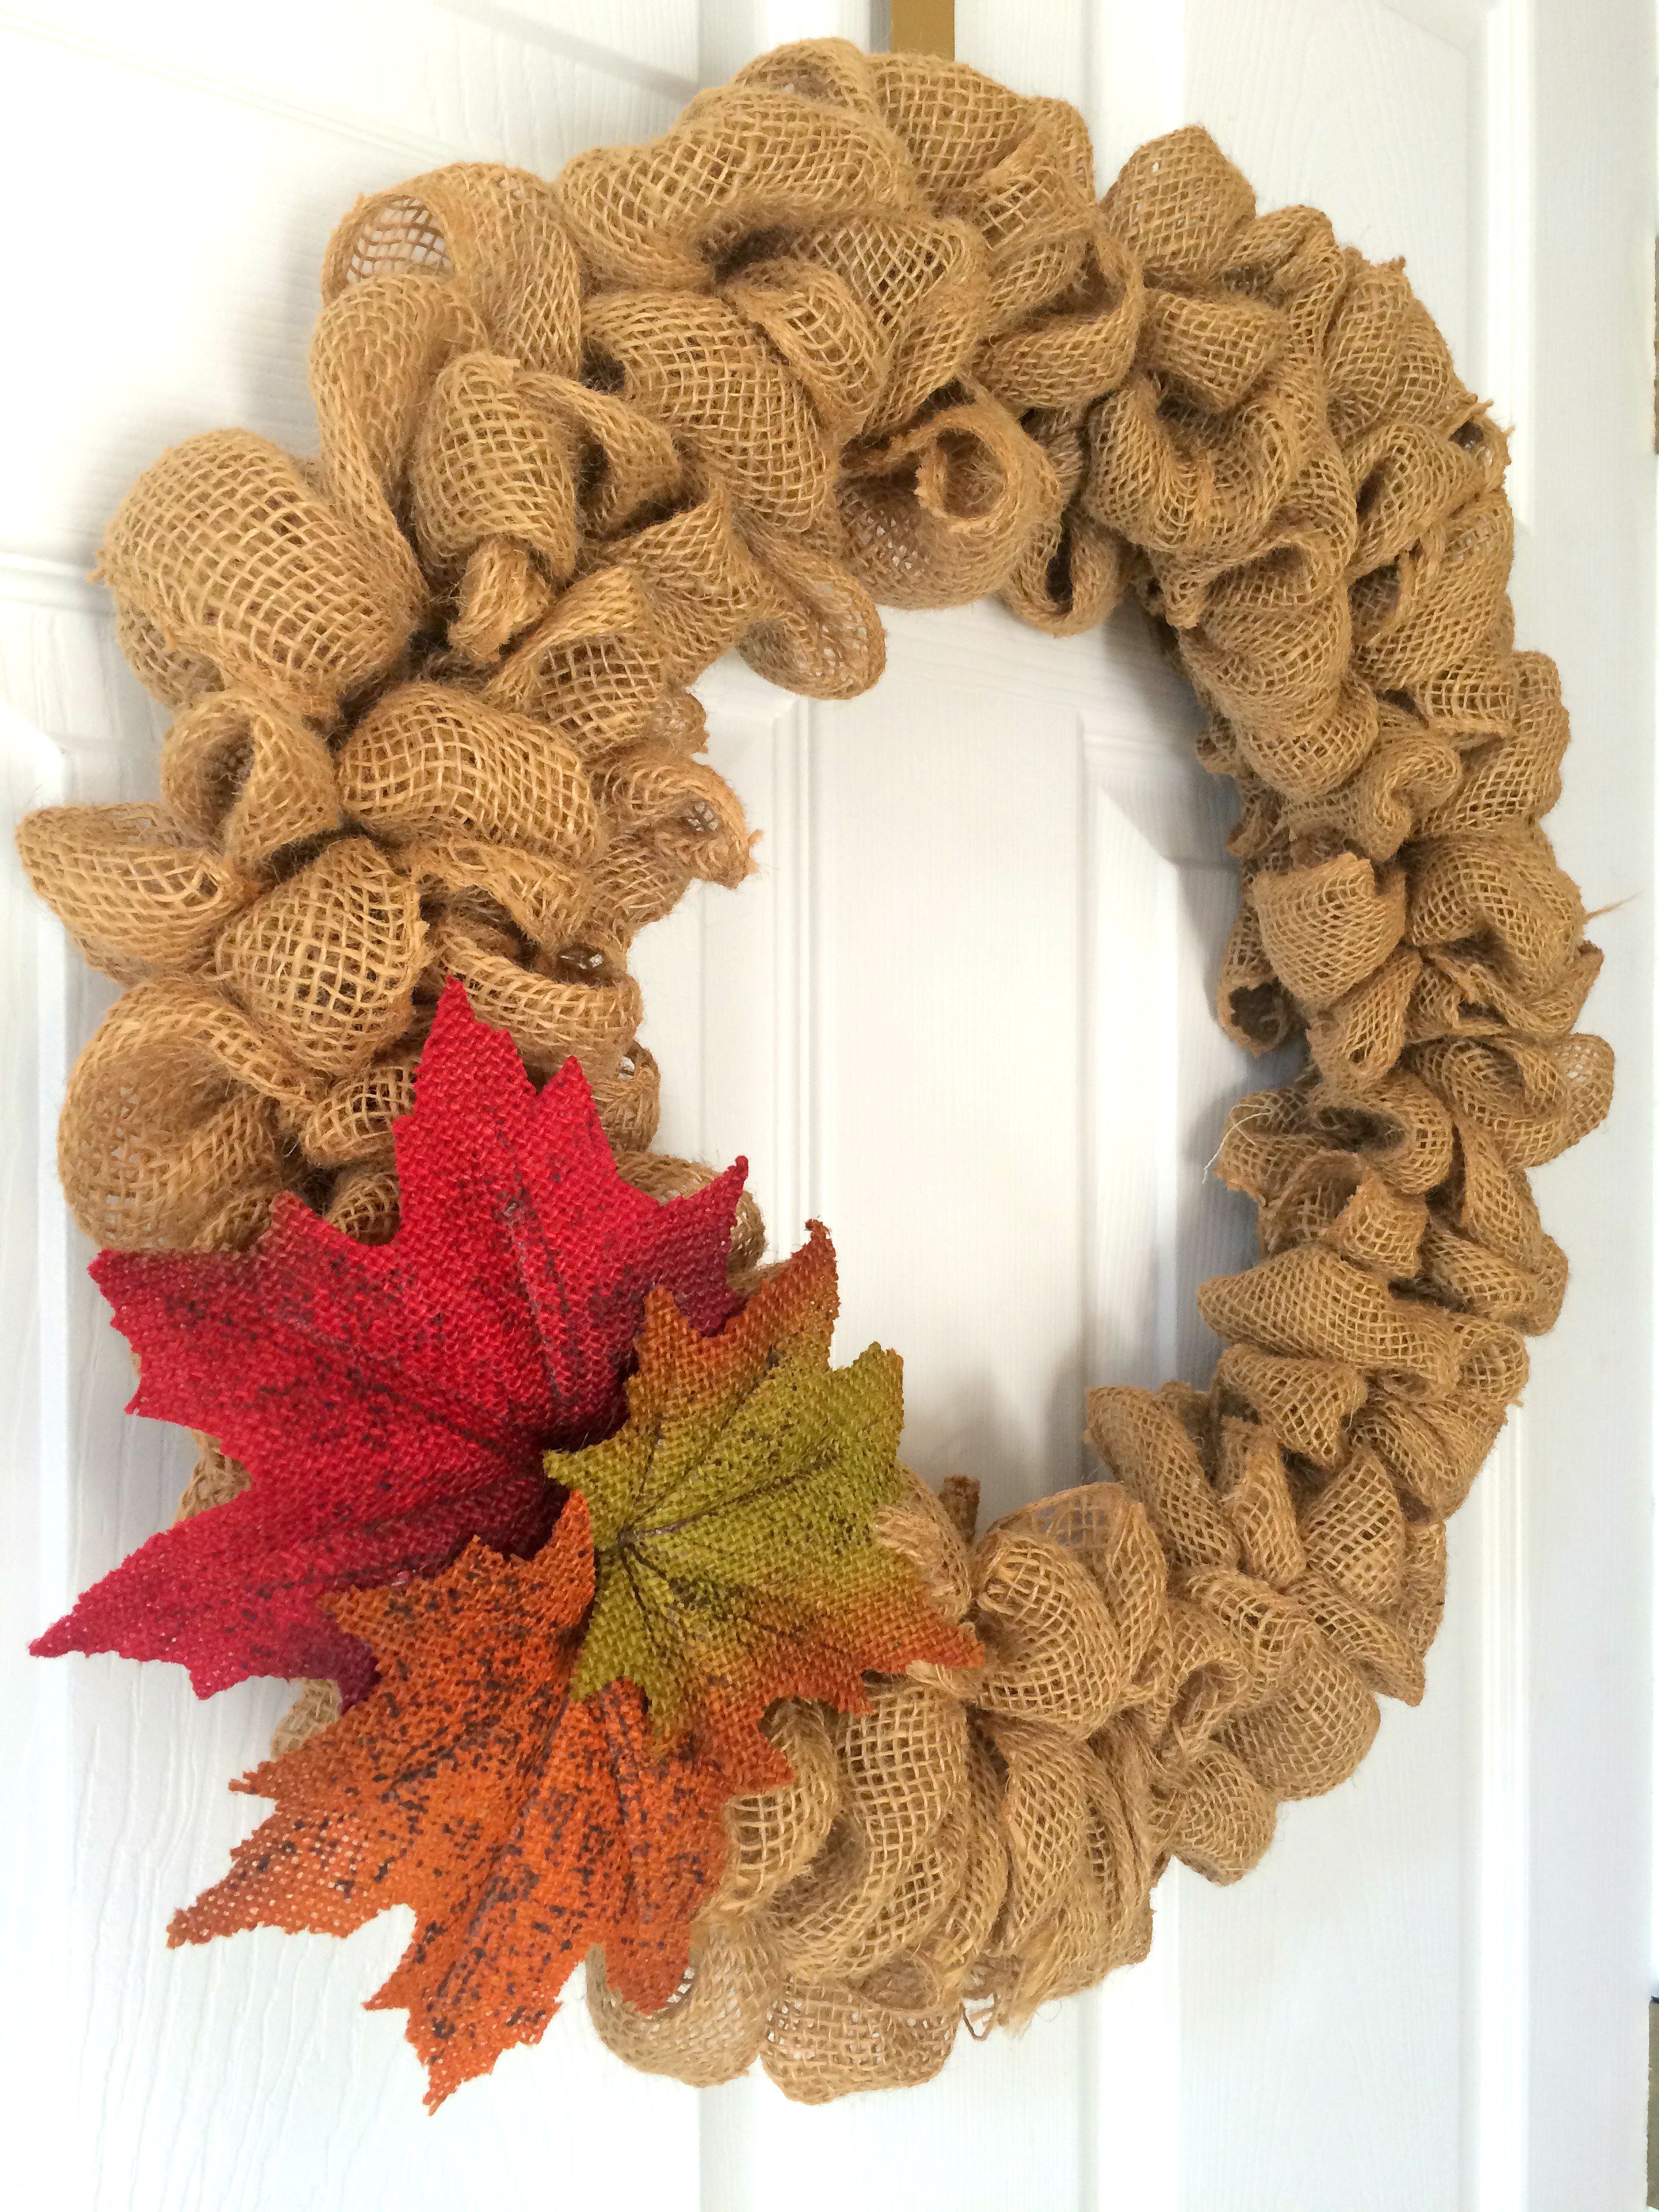
I made my first burlap bubble wreath last year and I love how simple and pretty this kid of wreath is. I love wreaths and think they make a home so much cozier, but I’m not a big fan of super big, sparkly ones with a million things going on. I like wreaths relatively simple with a pop of color and lots of pretty texture! This particular wreath is super easy to make and you could add any sort of little “garnish” you like. This is very similar to the patriotic burlap wreath tutorial I shared a while back, but is actually even easier because it only involves one color of burlap.
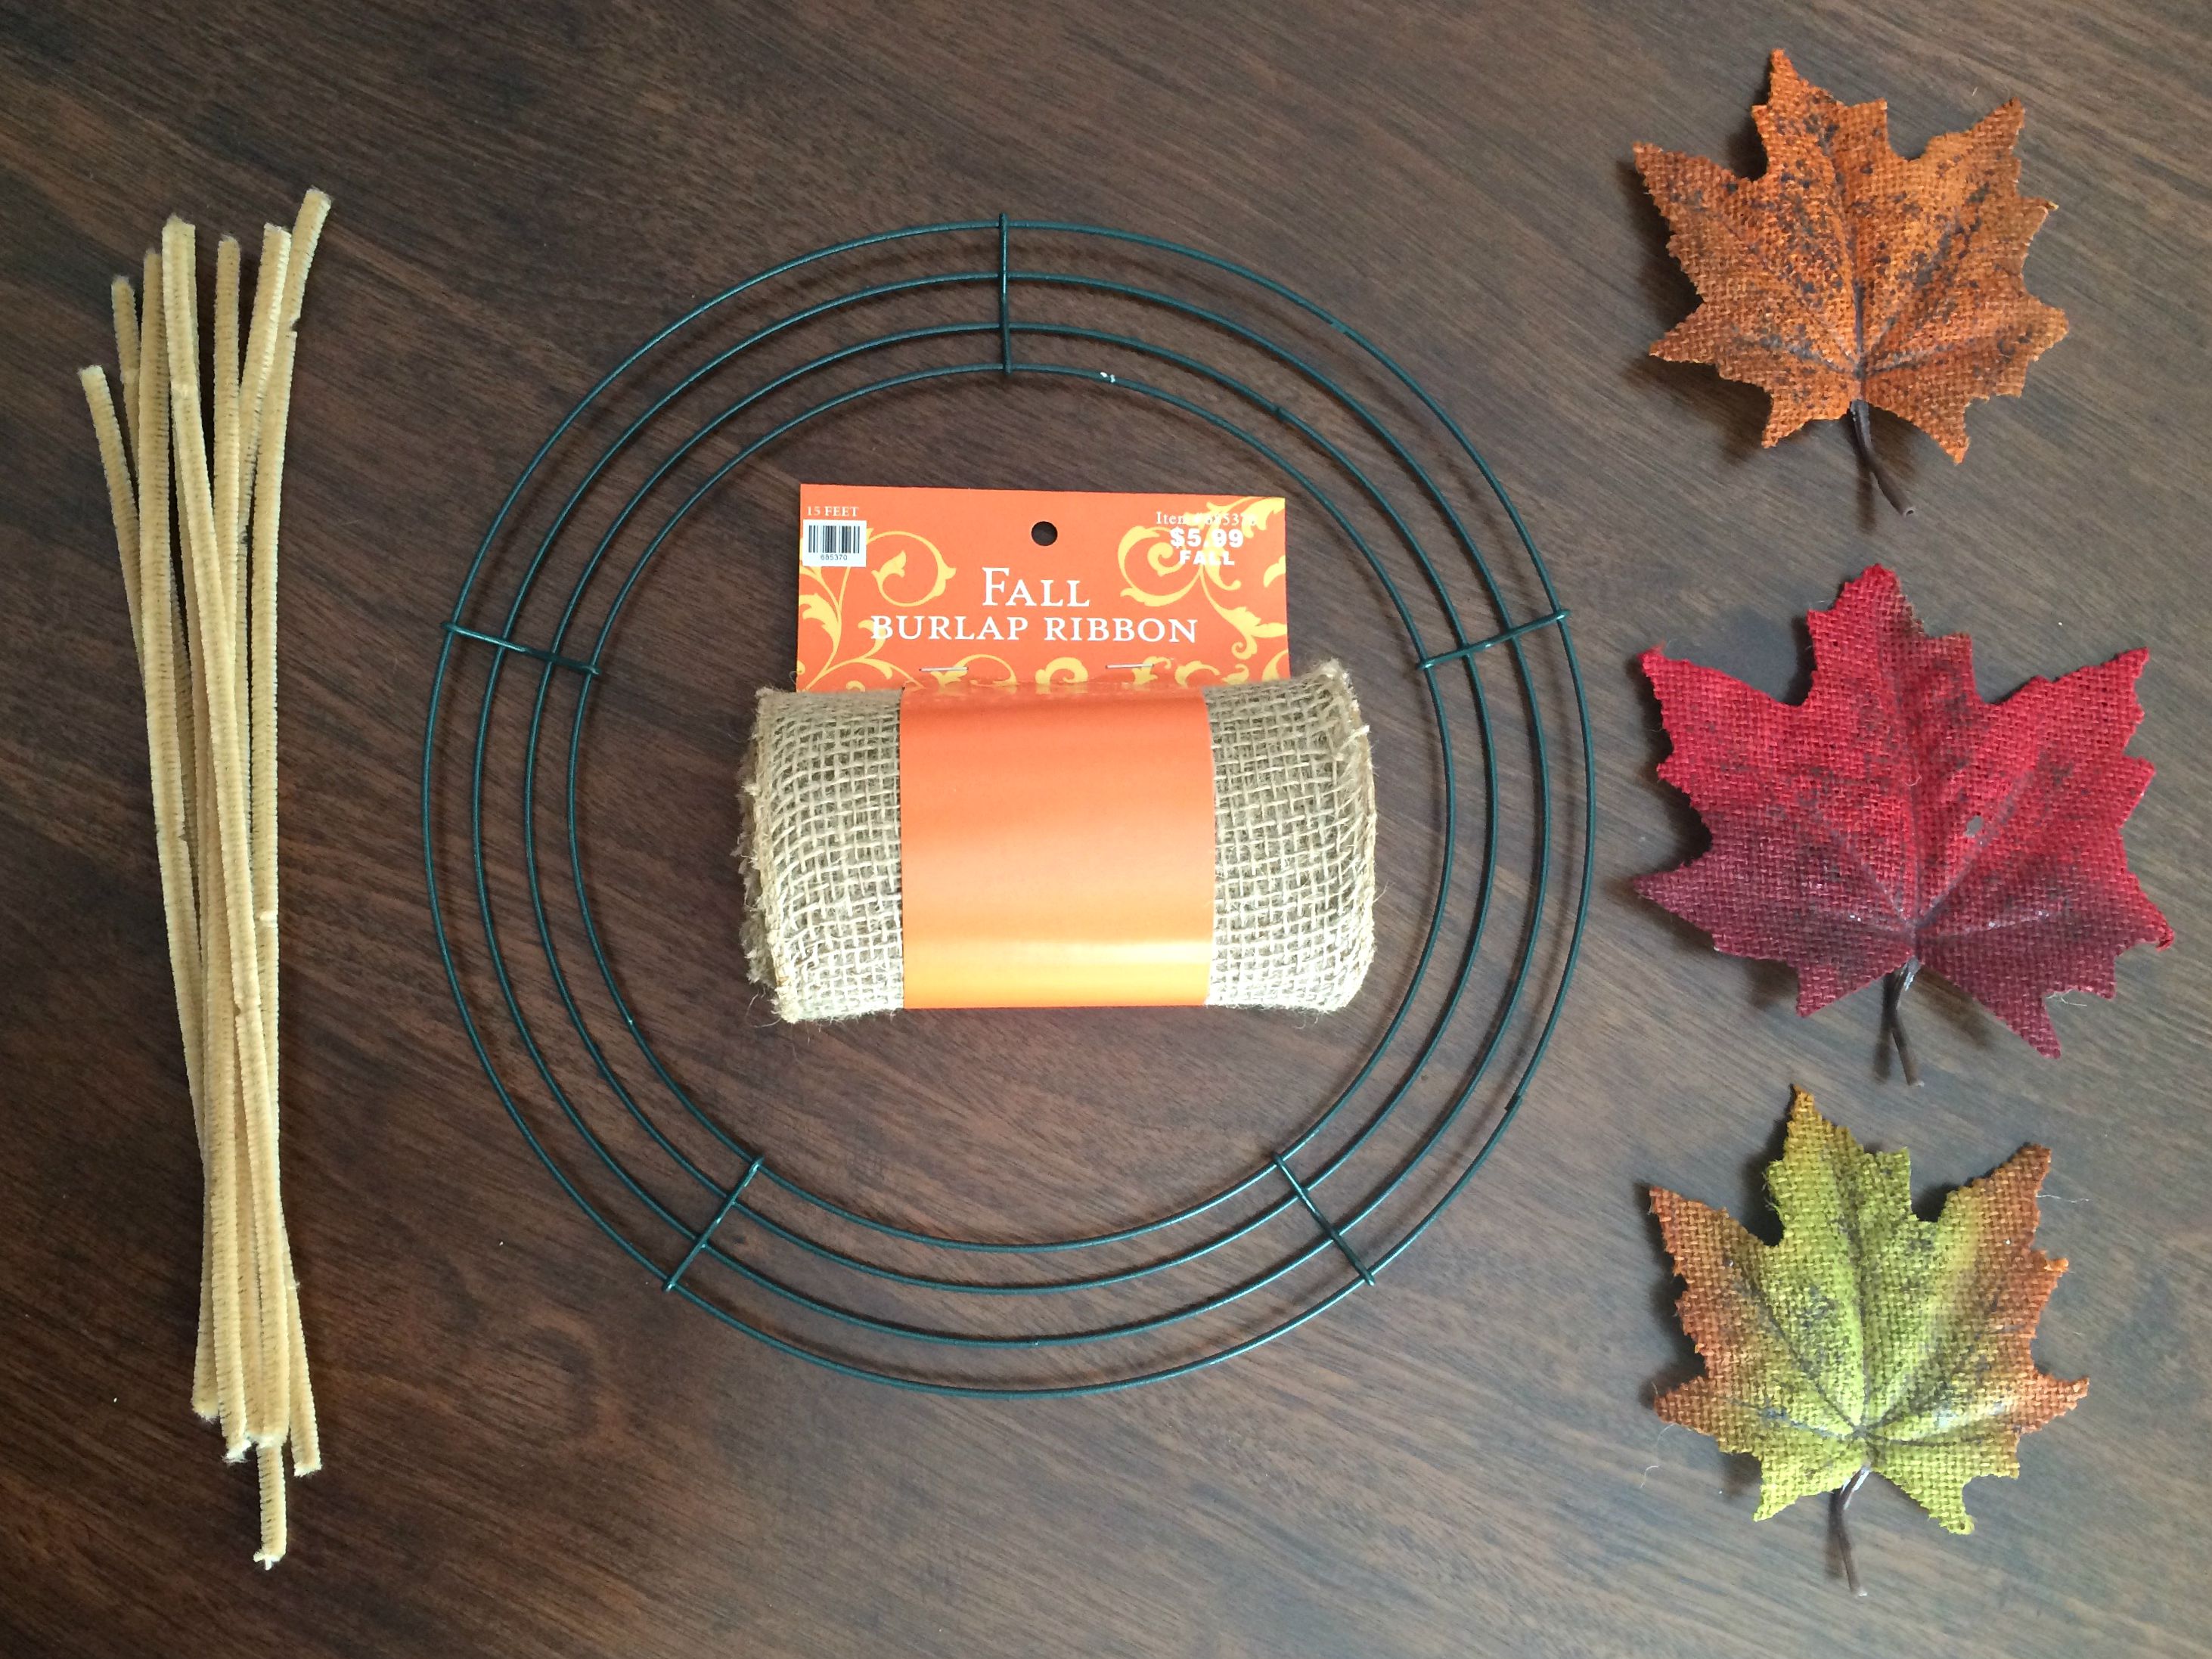
Materials:
- Approximately 3 rolls of burlap (depends on how big of wreath frame you choose)
- Wire wreath frame (choose whatever size you want!)
- Ribbon, leaves, or whatever you want to use to add a pop of color
- Pipe cleaners
How To Make A Rustic Fall Burlap Bubble Wreath
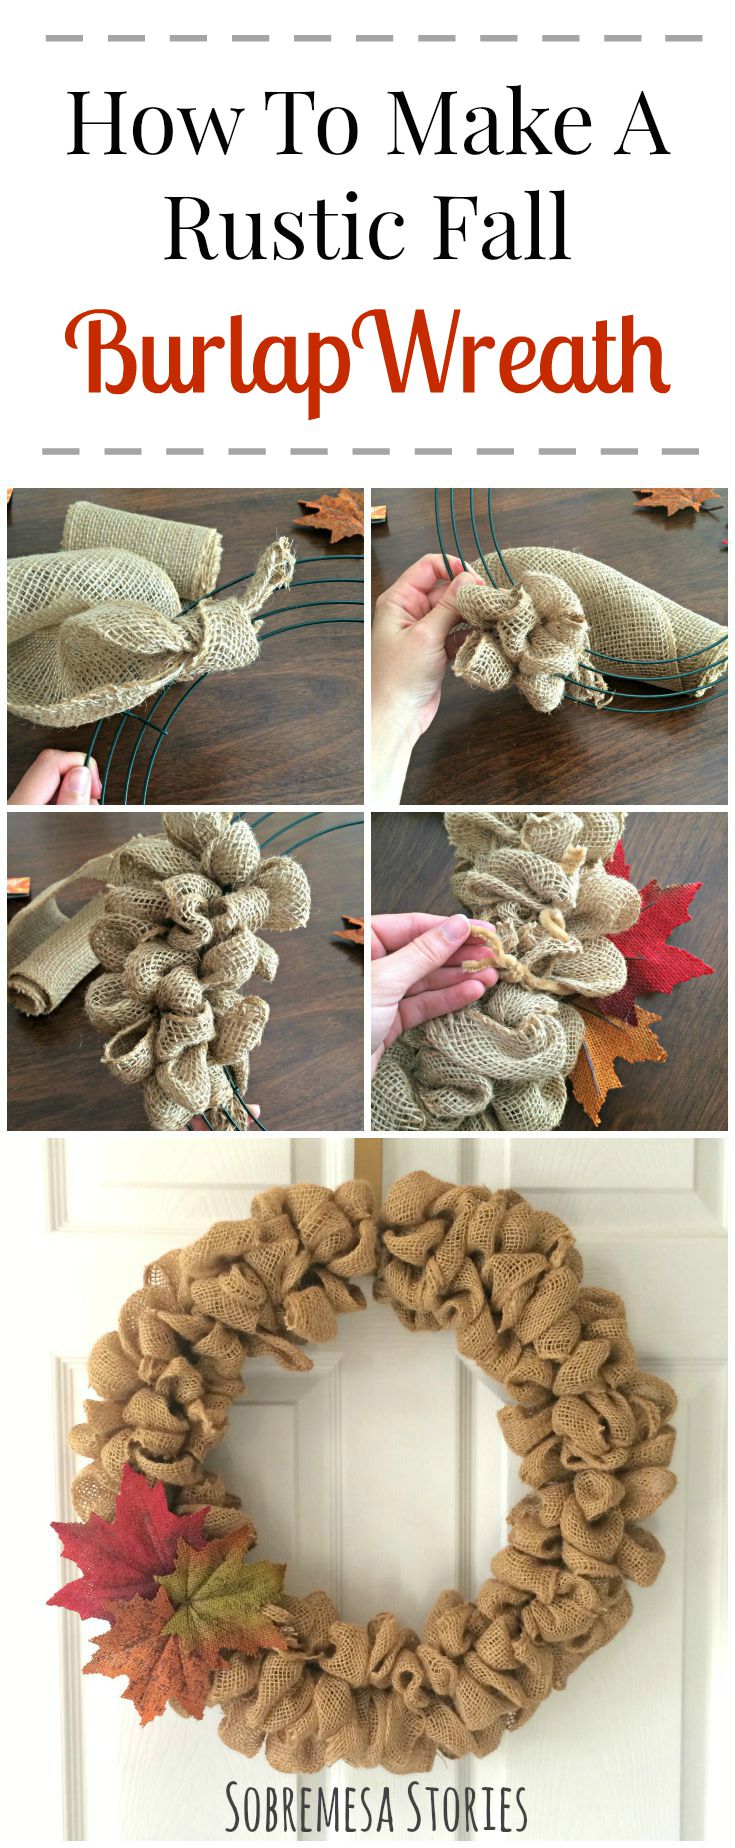
1. Tie the burlap to the wreath frame.
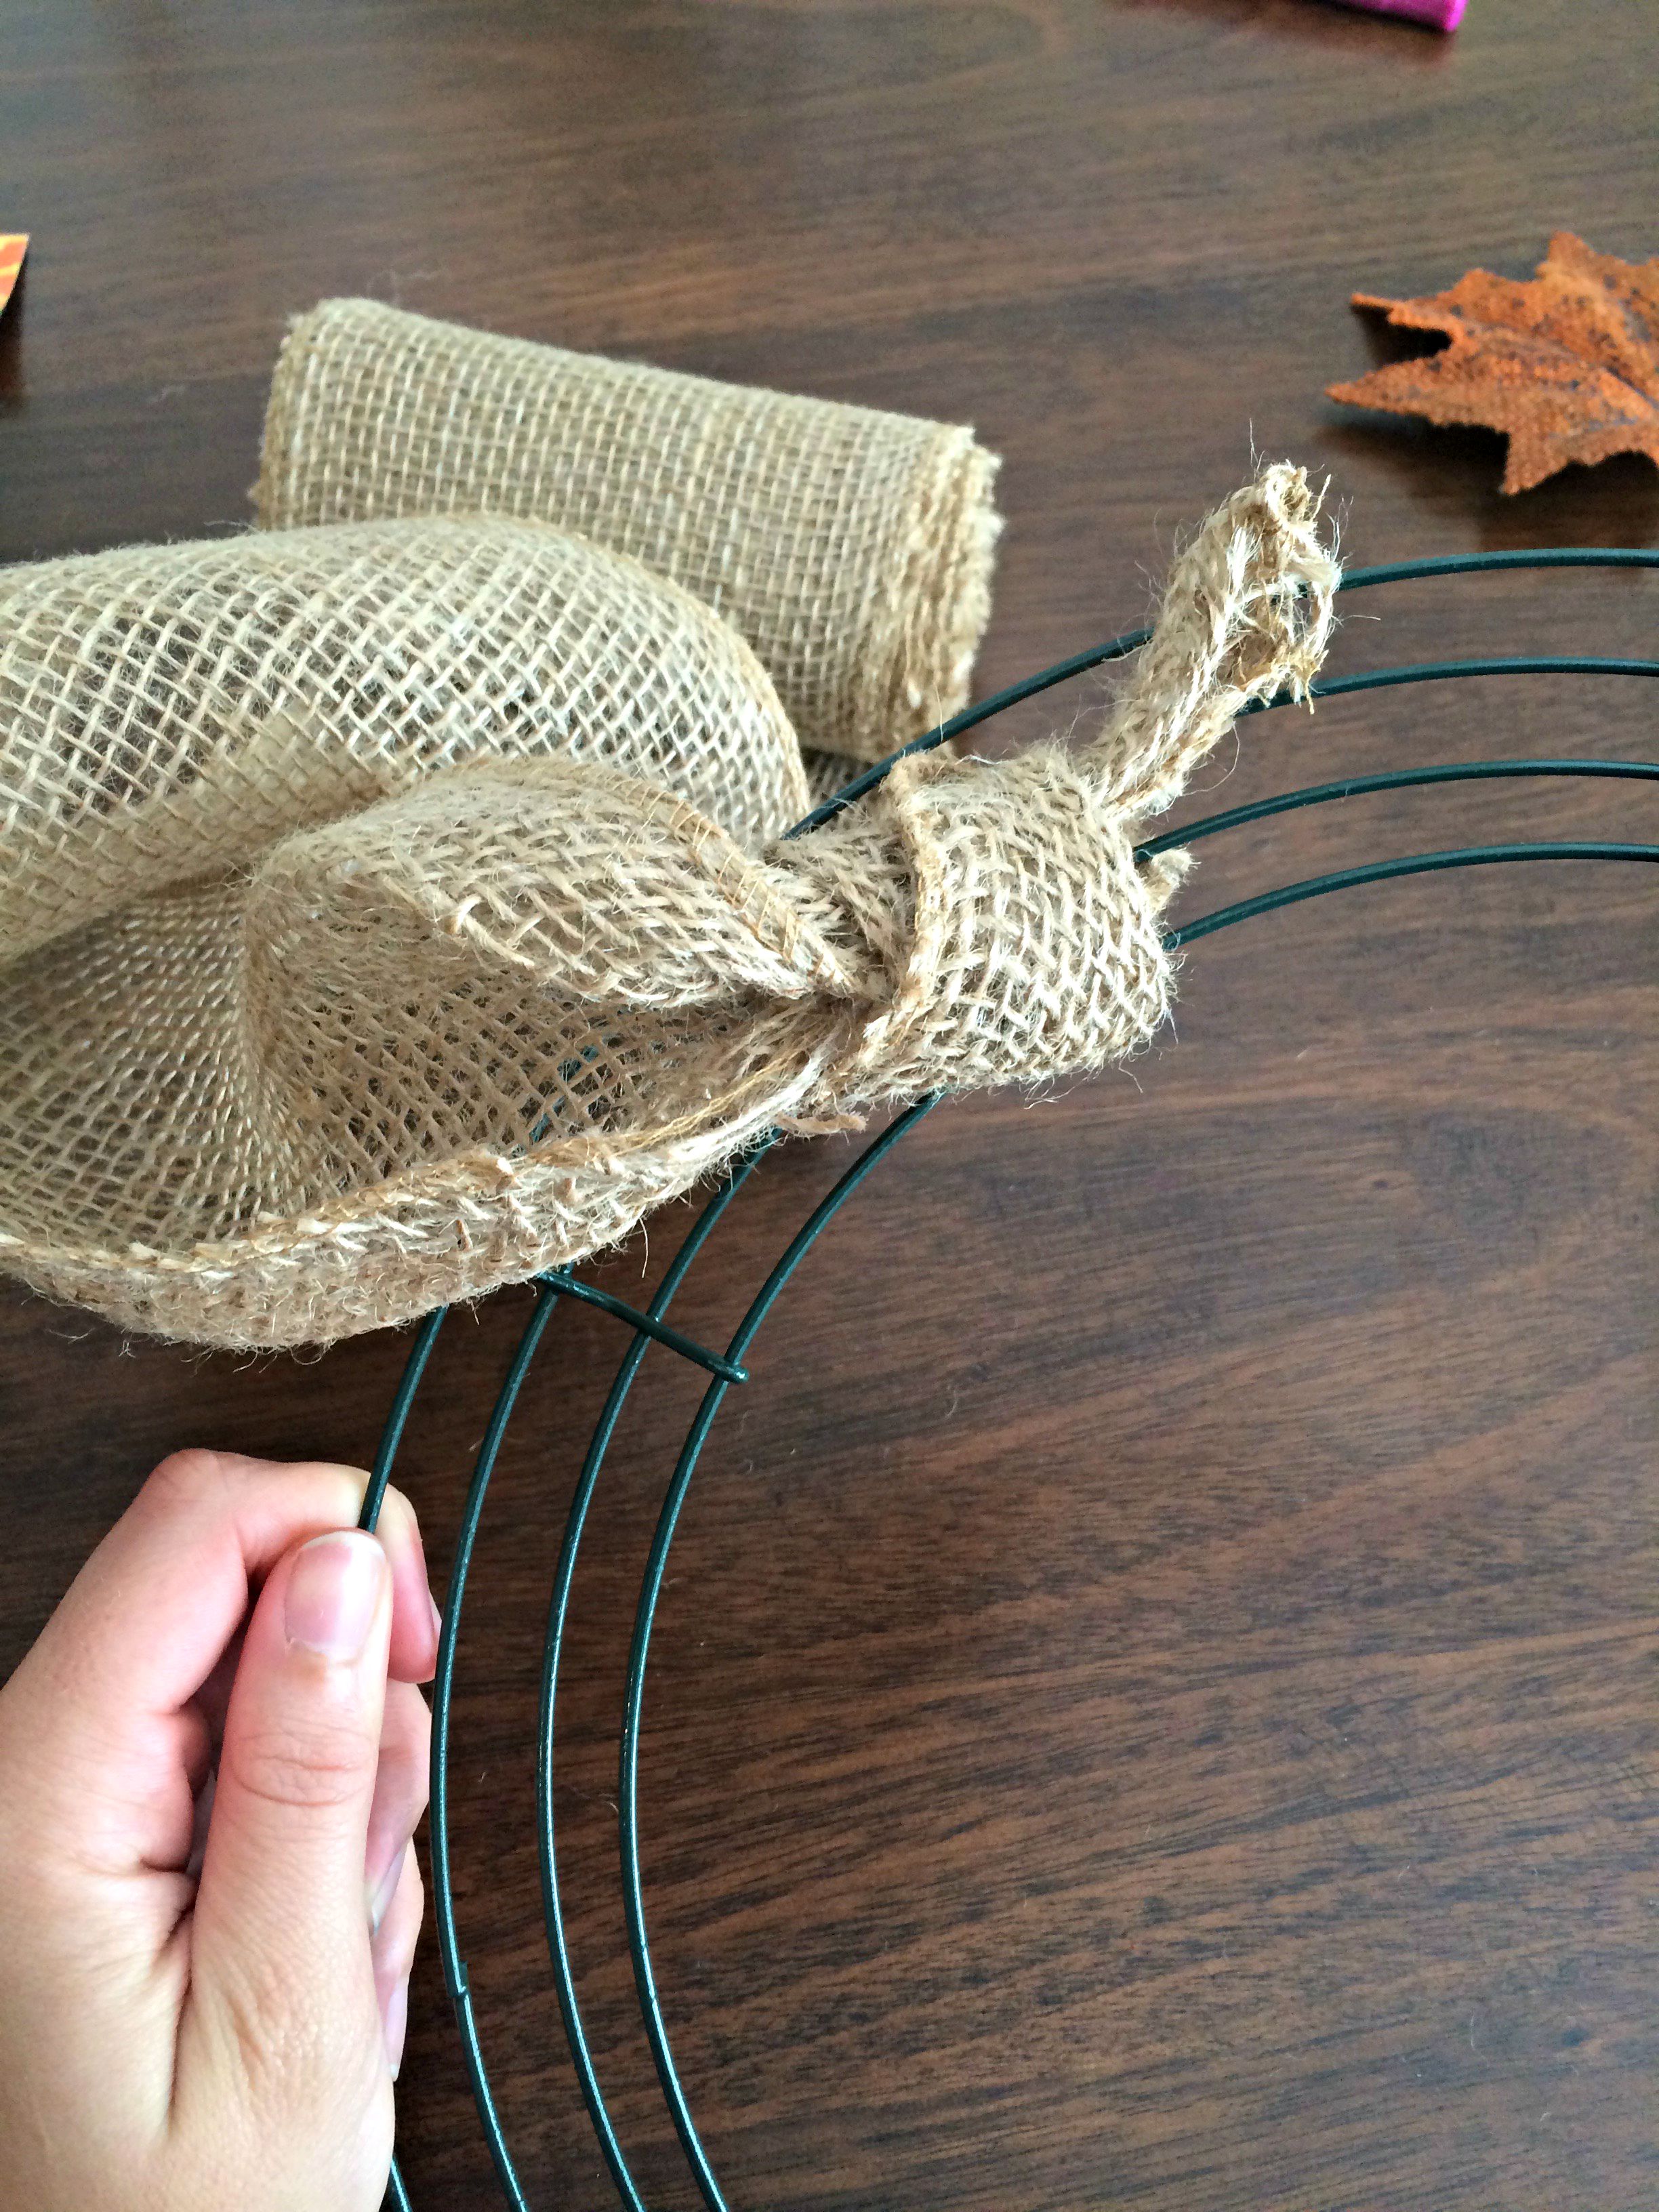
Tie the burlap in a knot around one of the outer rings. The knot should face toward the back of the wreath so you can pull the burlap through the front.
2. Pull the burlap out of the wreath frame to create a “bubble” or “loop.”

Flip the wreath frame over so the knot is on the back and you’re looking at the front. Reach your fingers through the wires to pull through one small loop of burlap. Tug and pull at the burlap until it forms a pretty little loop (how big you want it is up to you!). I usually let each loop come about 1-2 inches off the frame to give it some depth and texture. After you pull the loop through, twist the fabric below it once or twice before making another loop through the next wire gap. This twisting is what helps keep the loops in place so don’t skip this step!

Once you’ve done the three loops (one in each opening in the wreath frame), you’ll do the same process back across the frame starting at the opposite side (see picture). Basically, you will just keep making your way across the frame back and forth, pulling a loop through, twisting, and doing the next loop. It reminds me of doing a french braid: you have to use every finger to keep all the loops in place but after a few minutes you’ll start to get into a rhythm and it’ll go quick!
3. Repeat this process over and over, refining and tugging on the loops as you go to get a shape and texture you like.

(Notice Olive making a guest appearance while she watches squirrels out the kitchen window)
As you’re working your way around the frame, hold the wreath out in front of you every couple inches or so to make sure you like how it’s looking. You can pull on the loops to adjust them and get a better overall texture. When you finish one roll of burlap, tuck the extra piece into the back of the wreath where no one will see it (or use a pipe cleaner to twist it around the frame in the back), then tie another piece of burlap to the frame and continue with the process. I had to do this three times for this wreath.
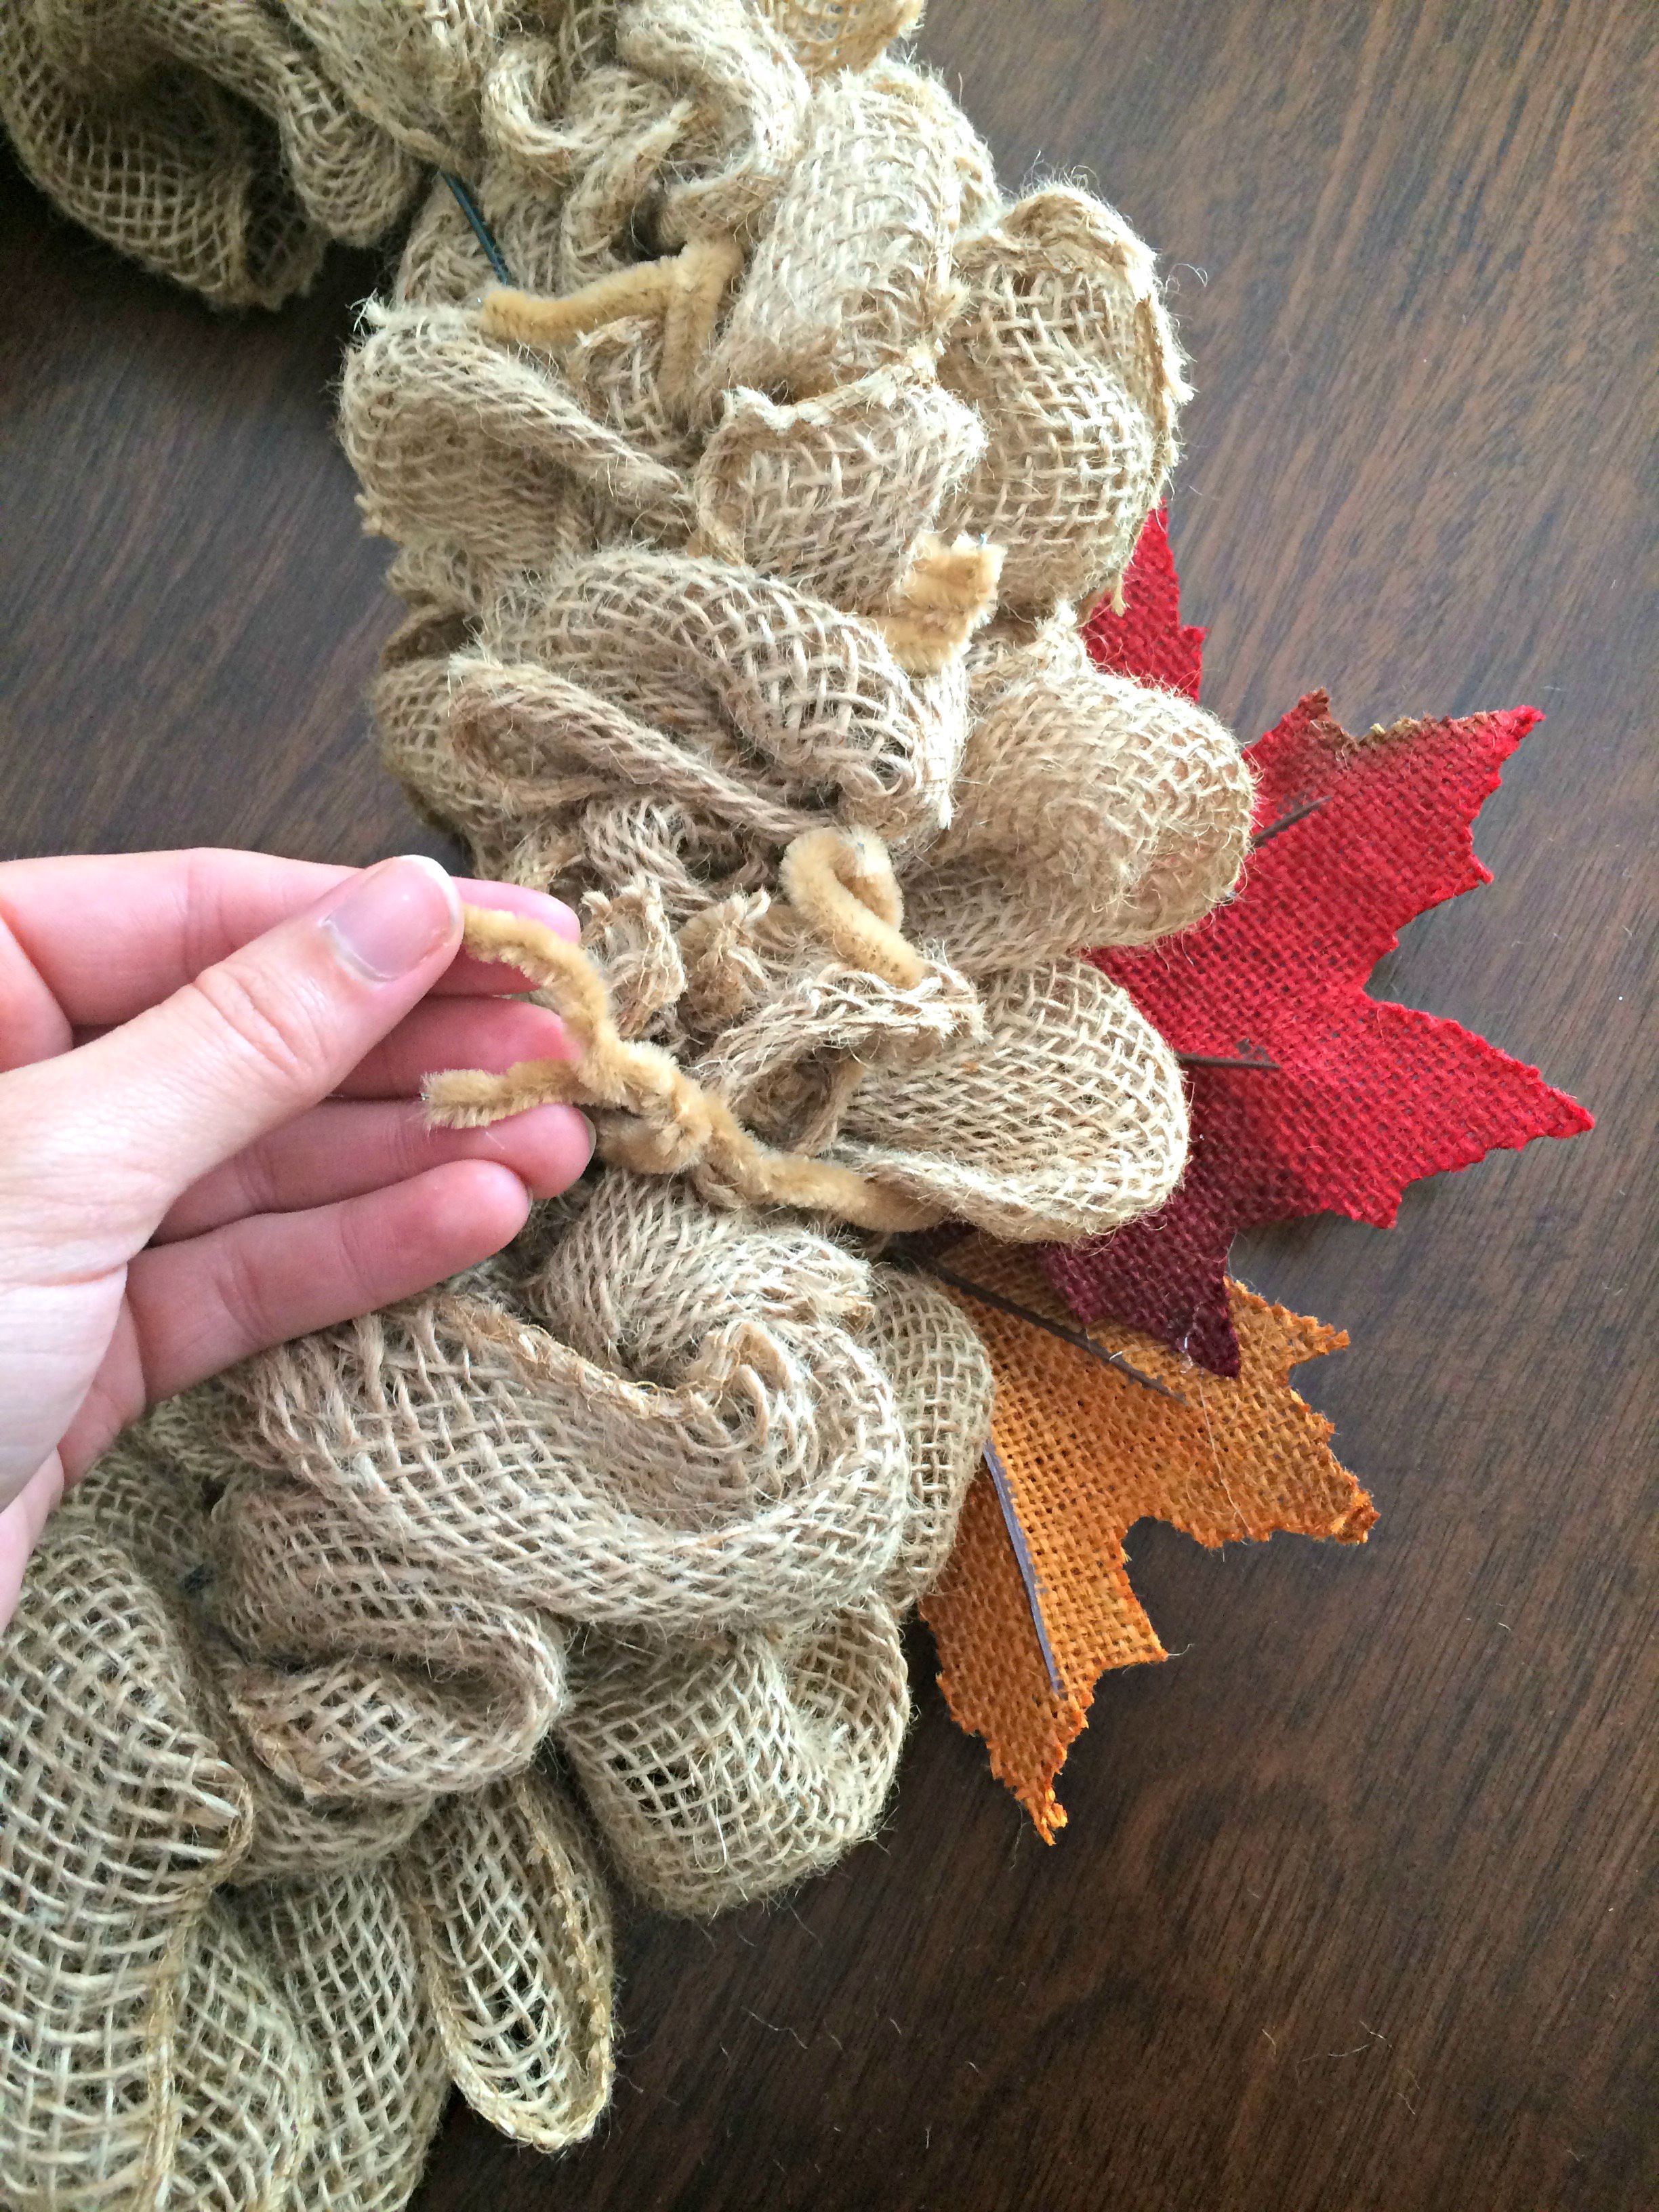
4. Cut off or tie up any loose ends using pipe cleaners.
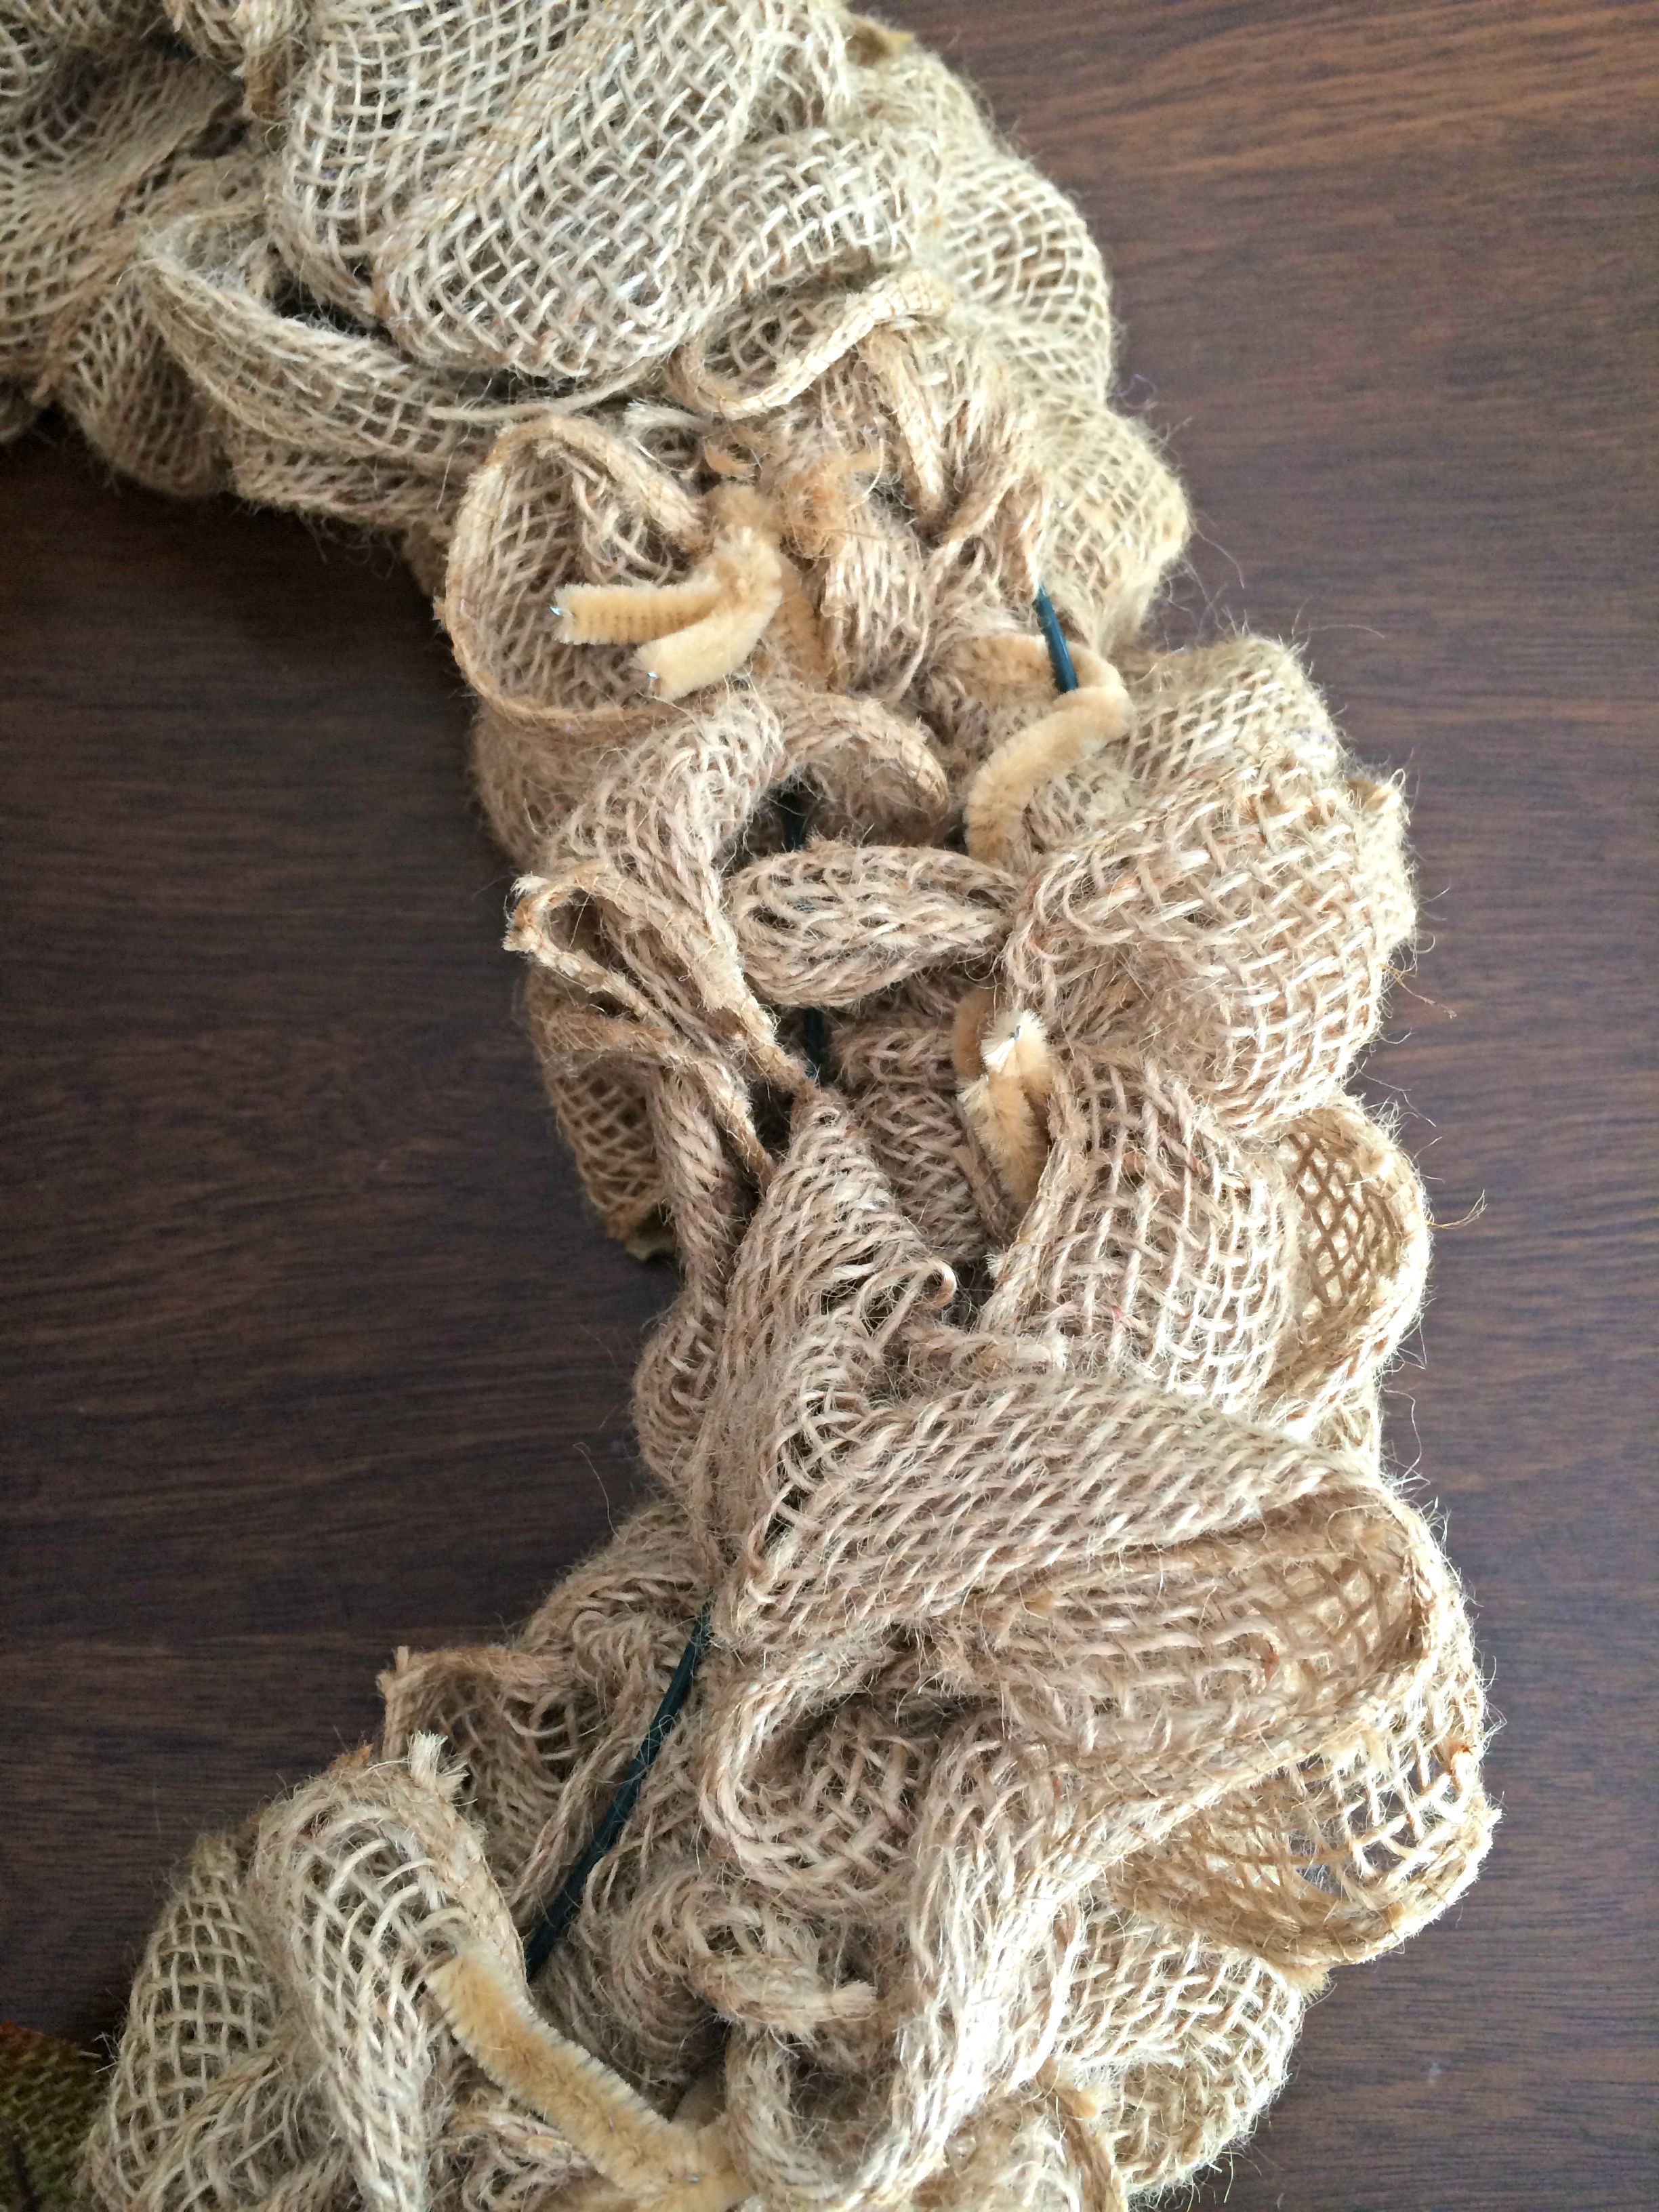
Notice how messy the back of the wreath looks. If you’re like me, something like this can send you into a perfectionist-crafting-panic-spiral (this is an official psychological term, y’all). Just know that nobody sees this part and tie it up with excessive pipe cleaners! Nobody will be the wiser, I promise.
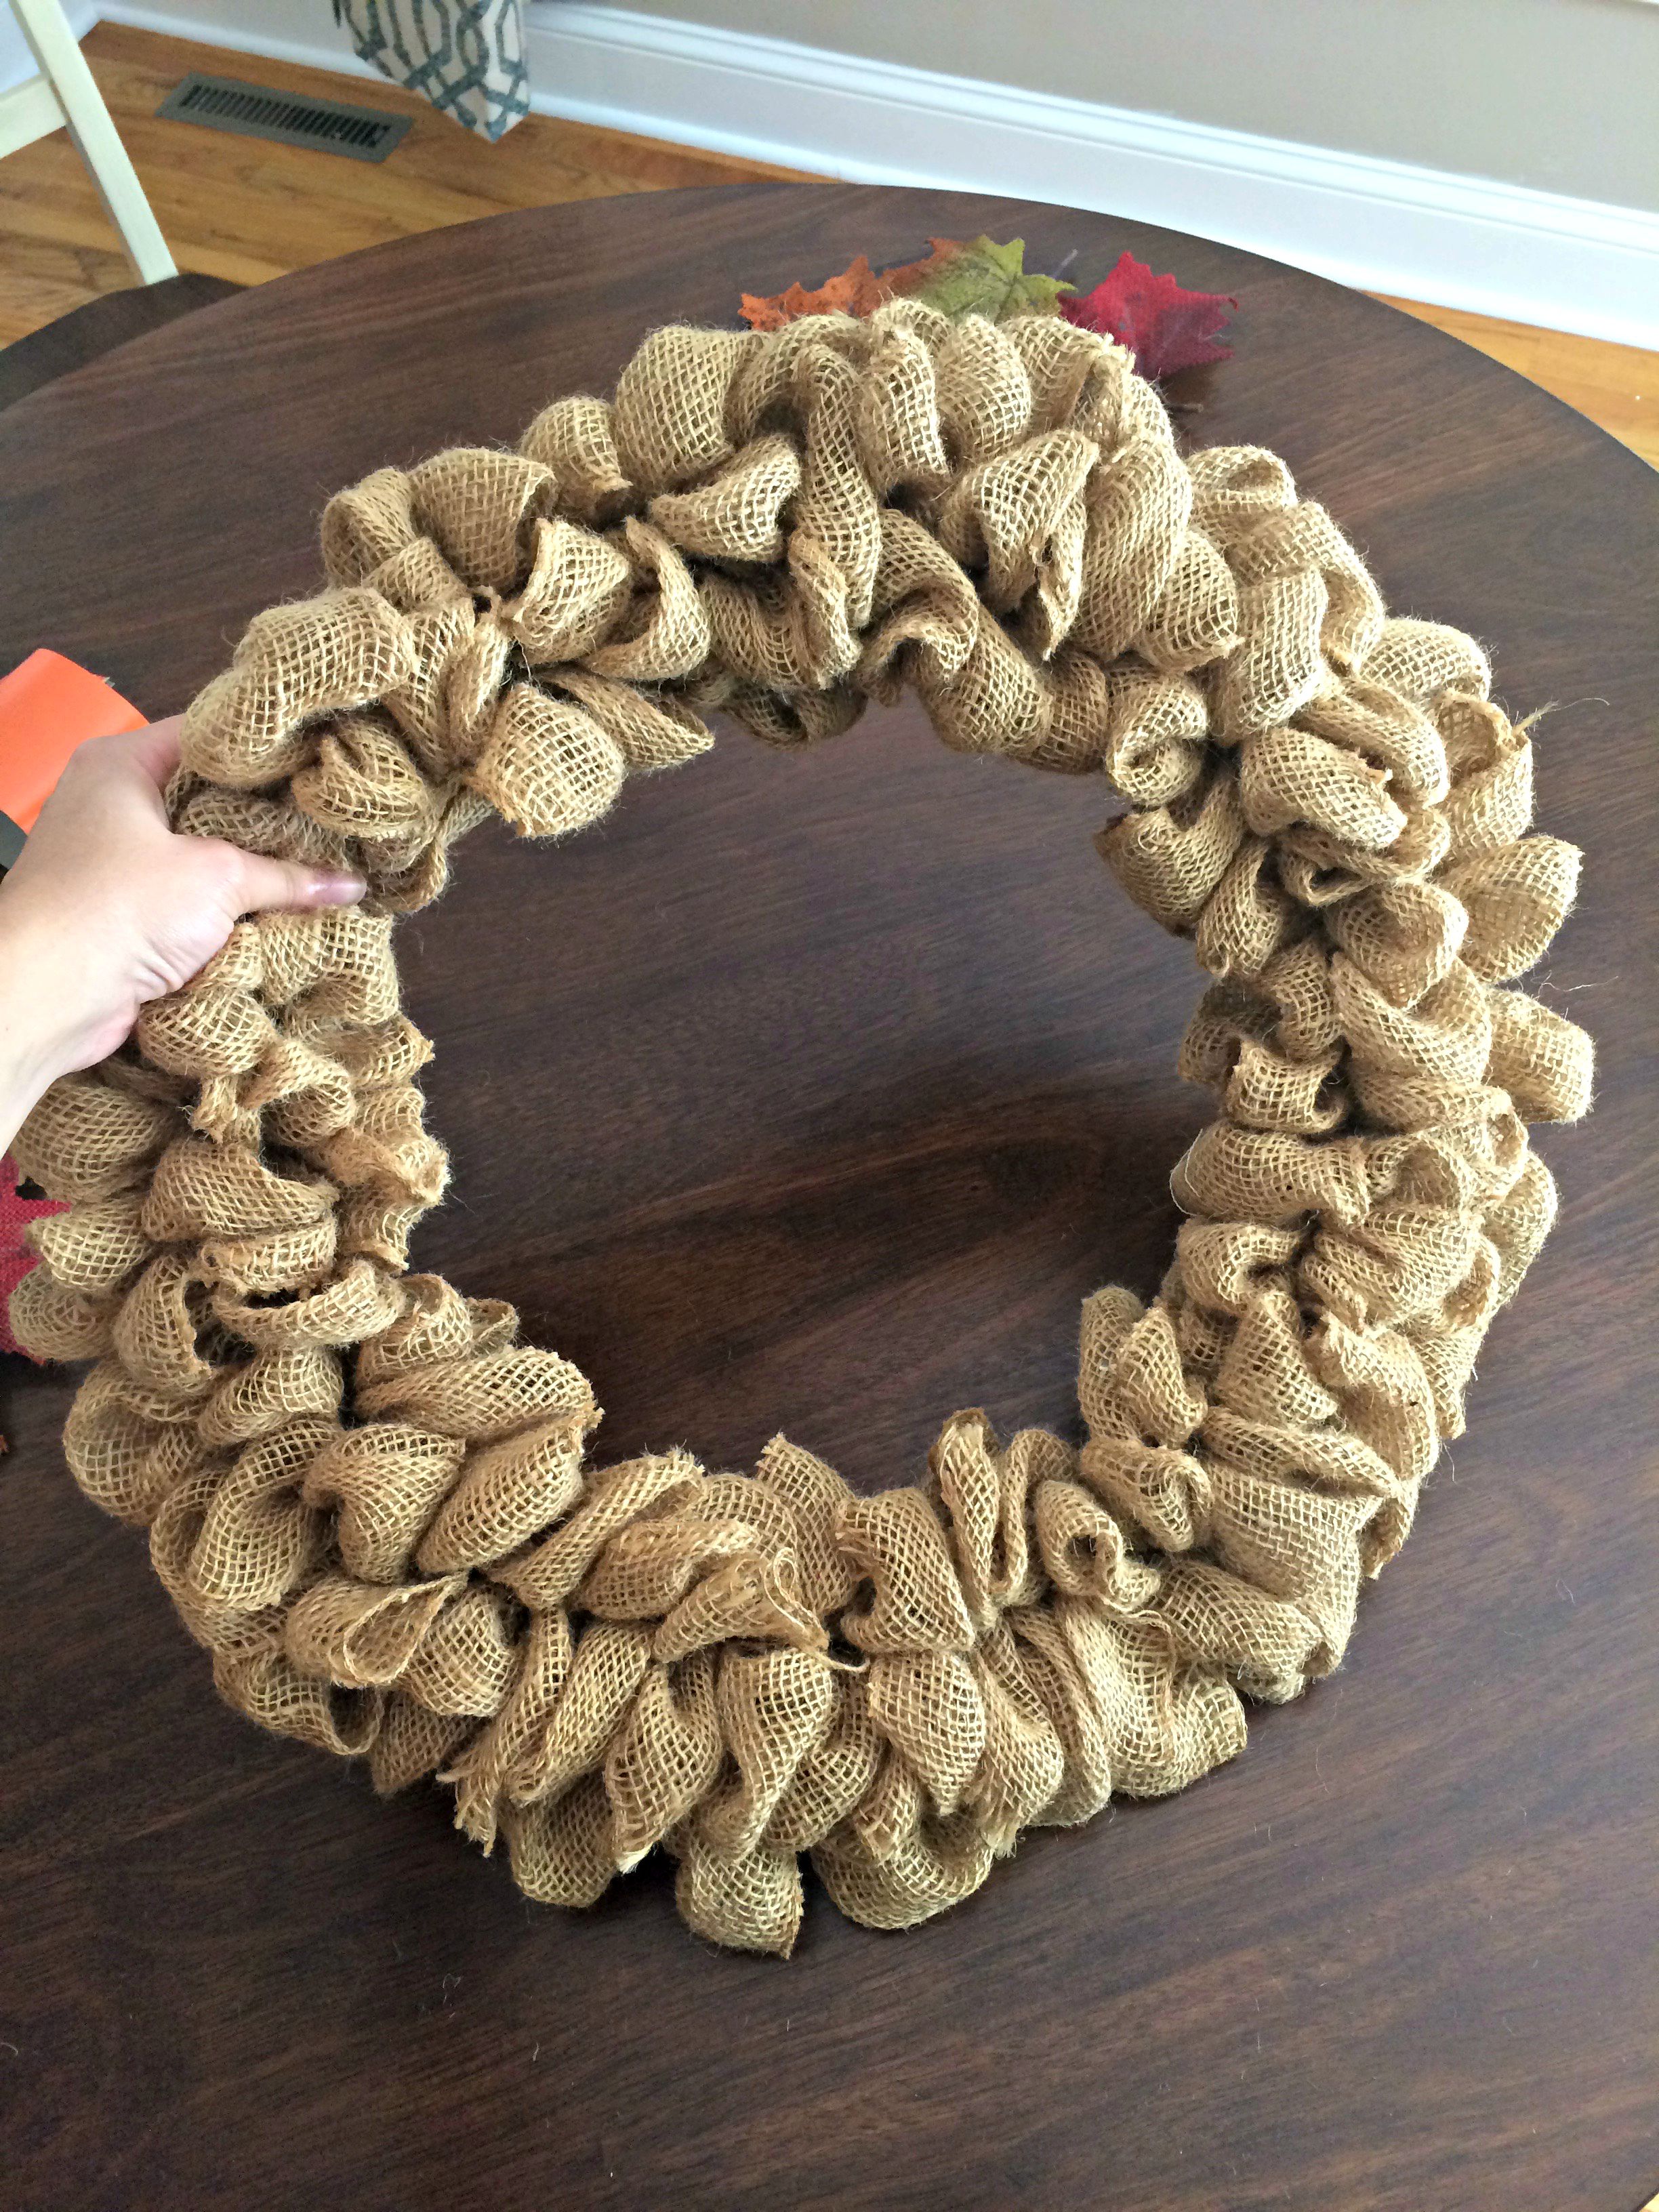
When you get to the very end, tie the remaining burlap in a knot on the back of the wreath and cut off any extra. Look at the wreath overall and do any other necessary adjustments to make the loops look full and even!
5. Add some sort of bow or garnish to finish it off.
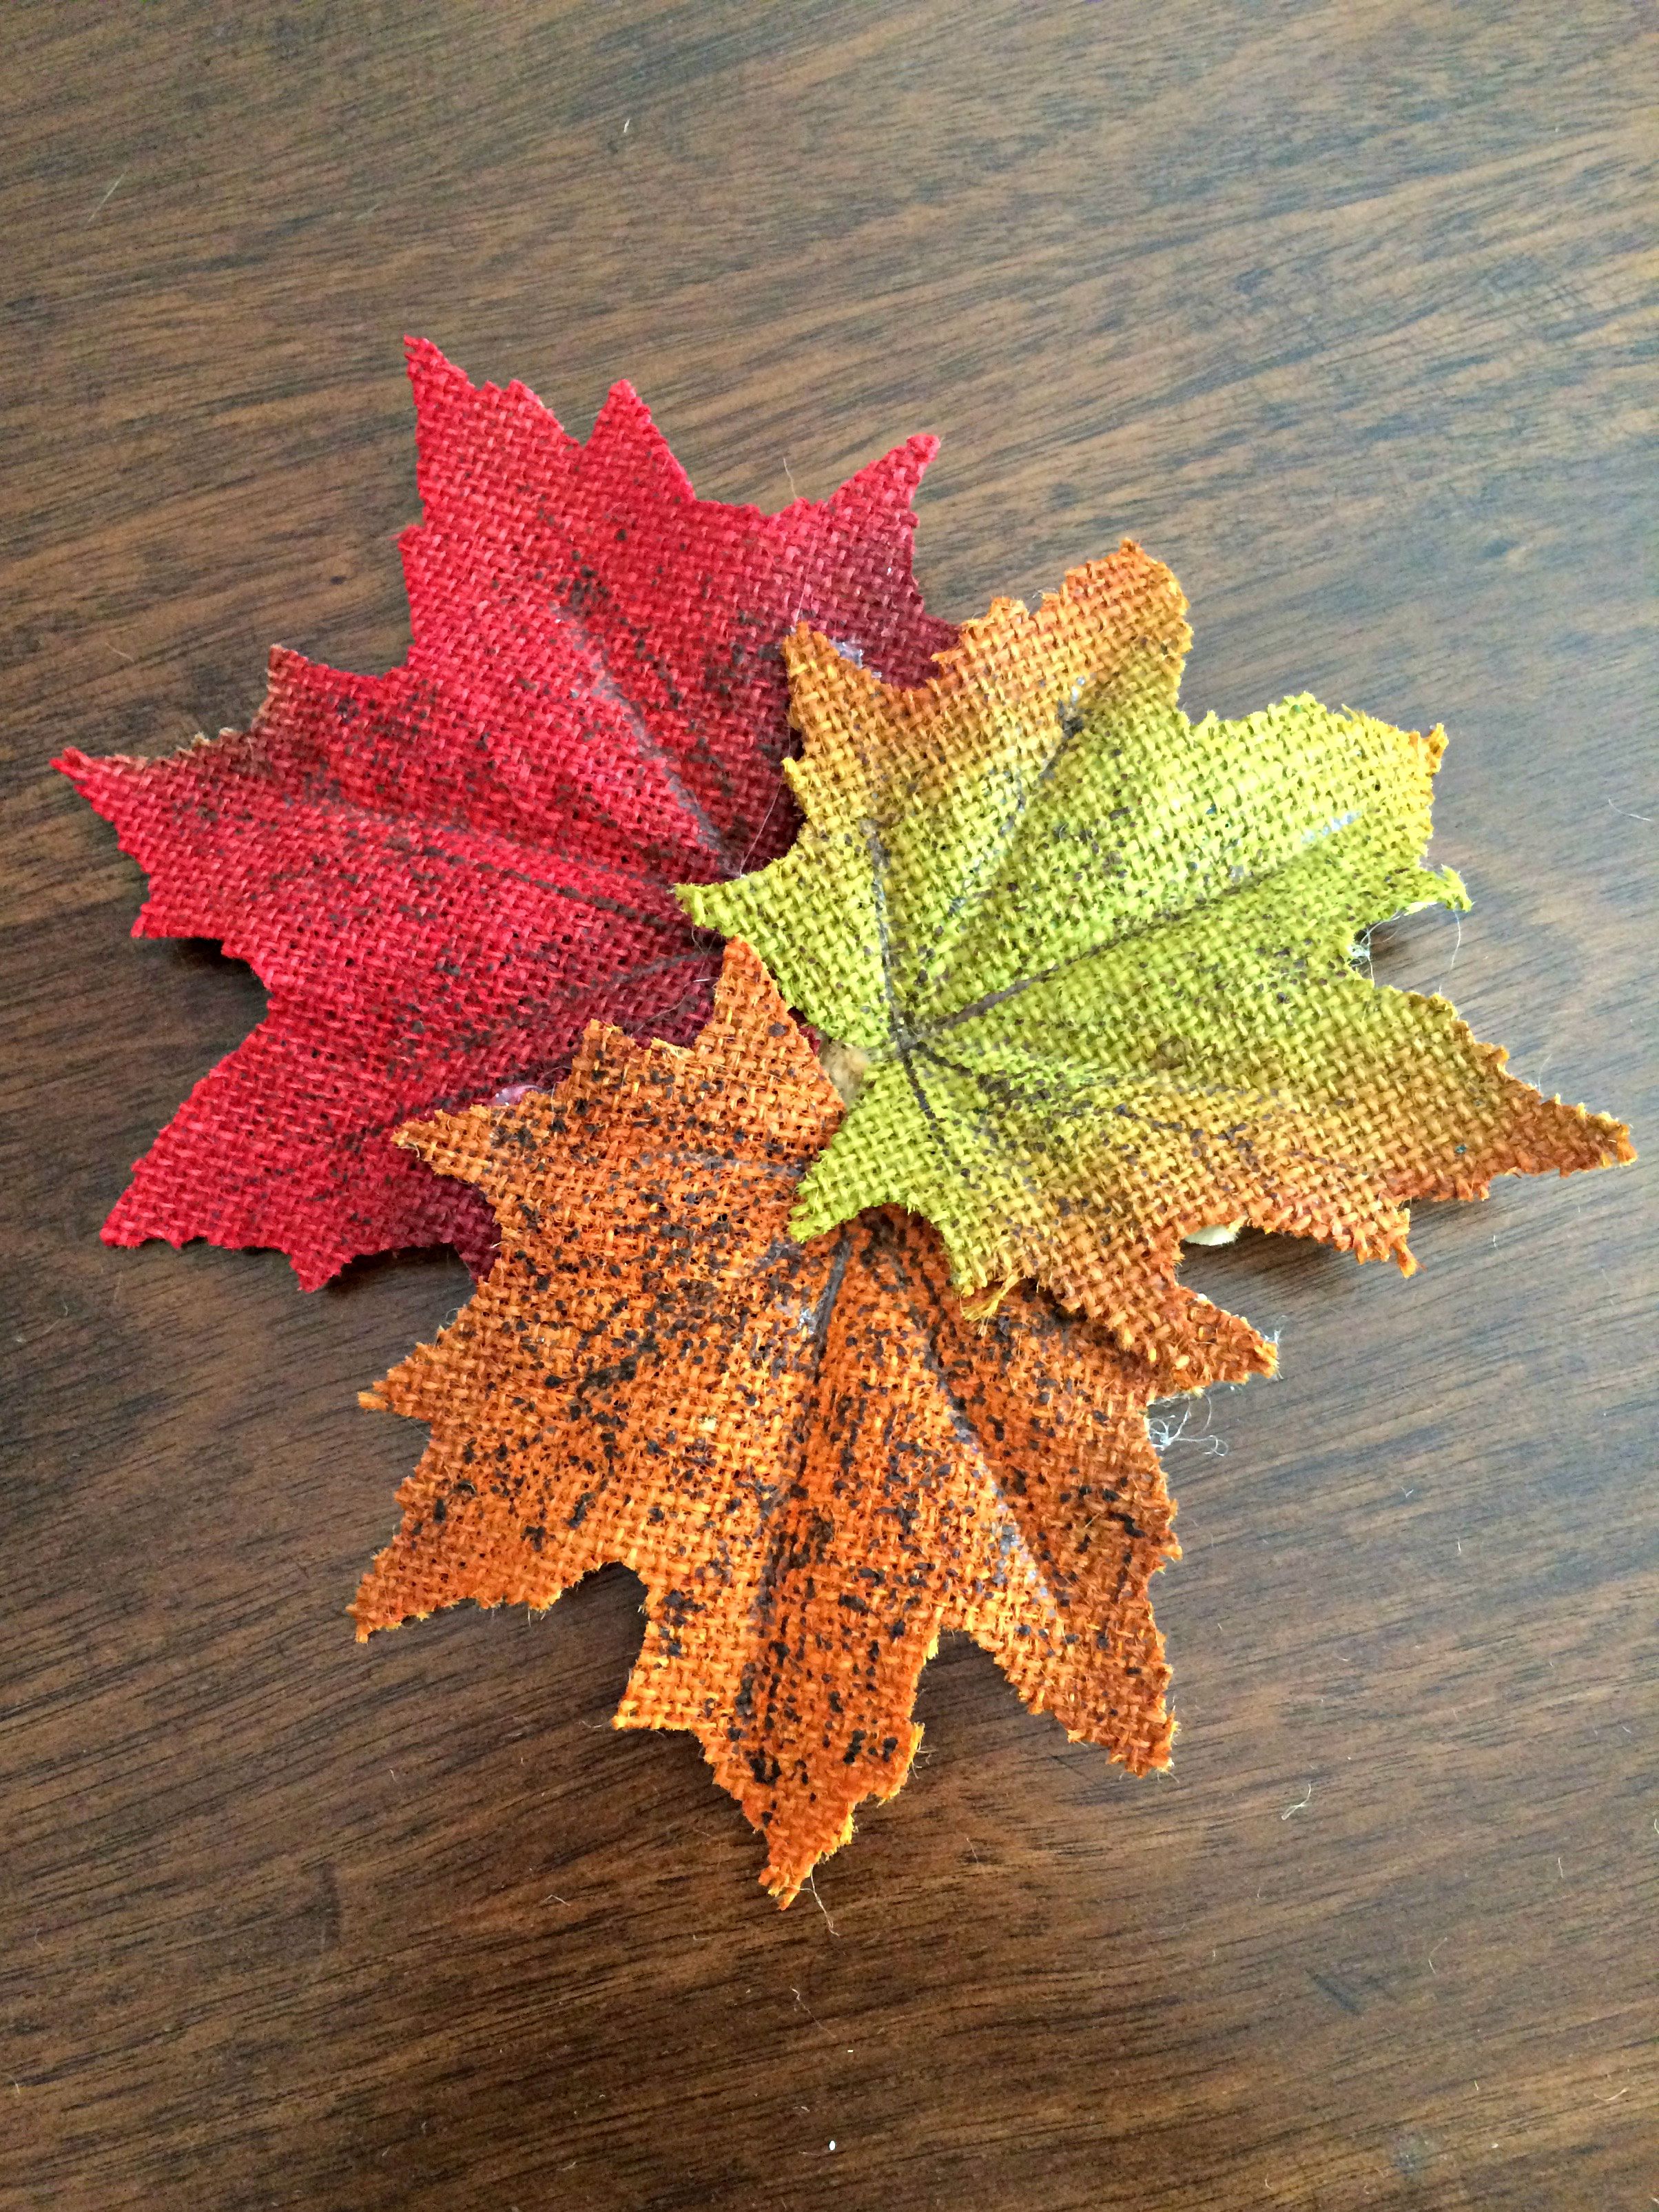
Now it’s the fun (or if you’re me, semi-stressful part – like I’ve said before, I can be an insecure crafter sometimes). You can add any sort of extra decoration to finish it off. I loved the simplicity and pop of color of these little burlap leaves from World Market, so I did the highly technical crafting process of hot gluing them together and then threaded pipe cleaners through the stems and tied them to the back of the wreath.
6. Enjoy the finished product!
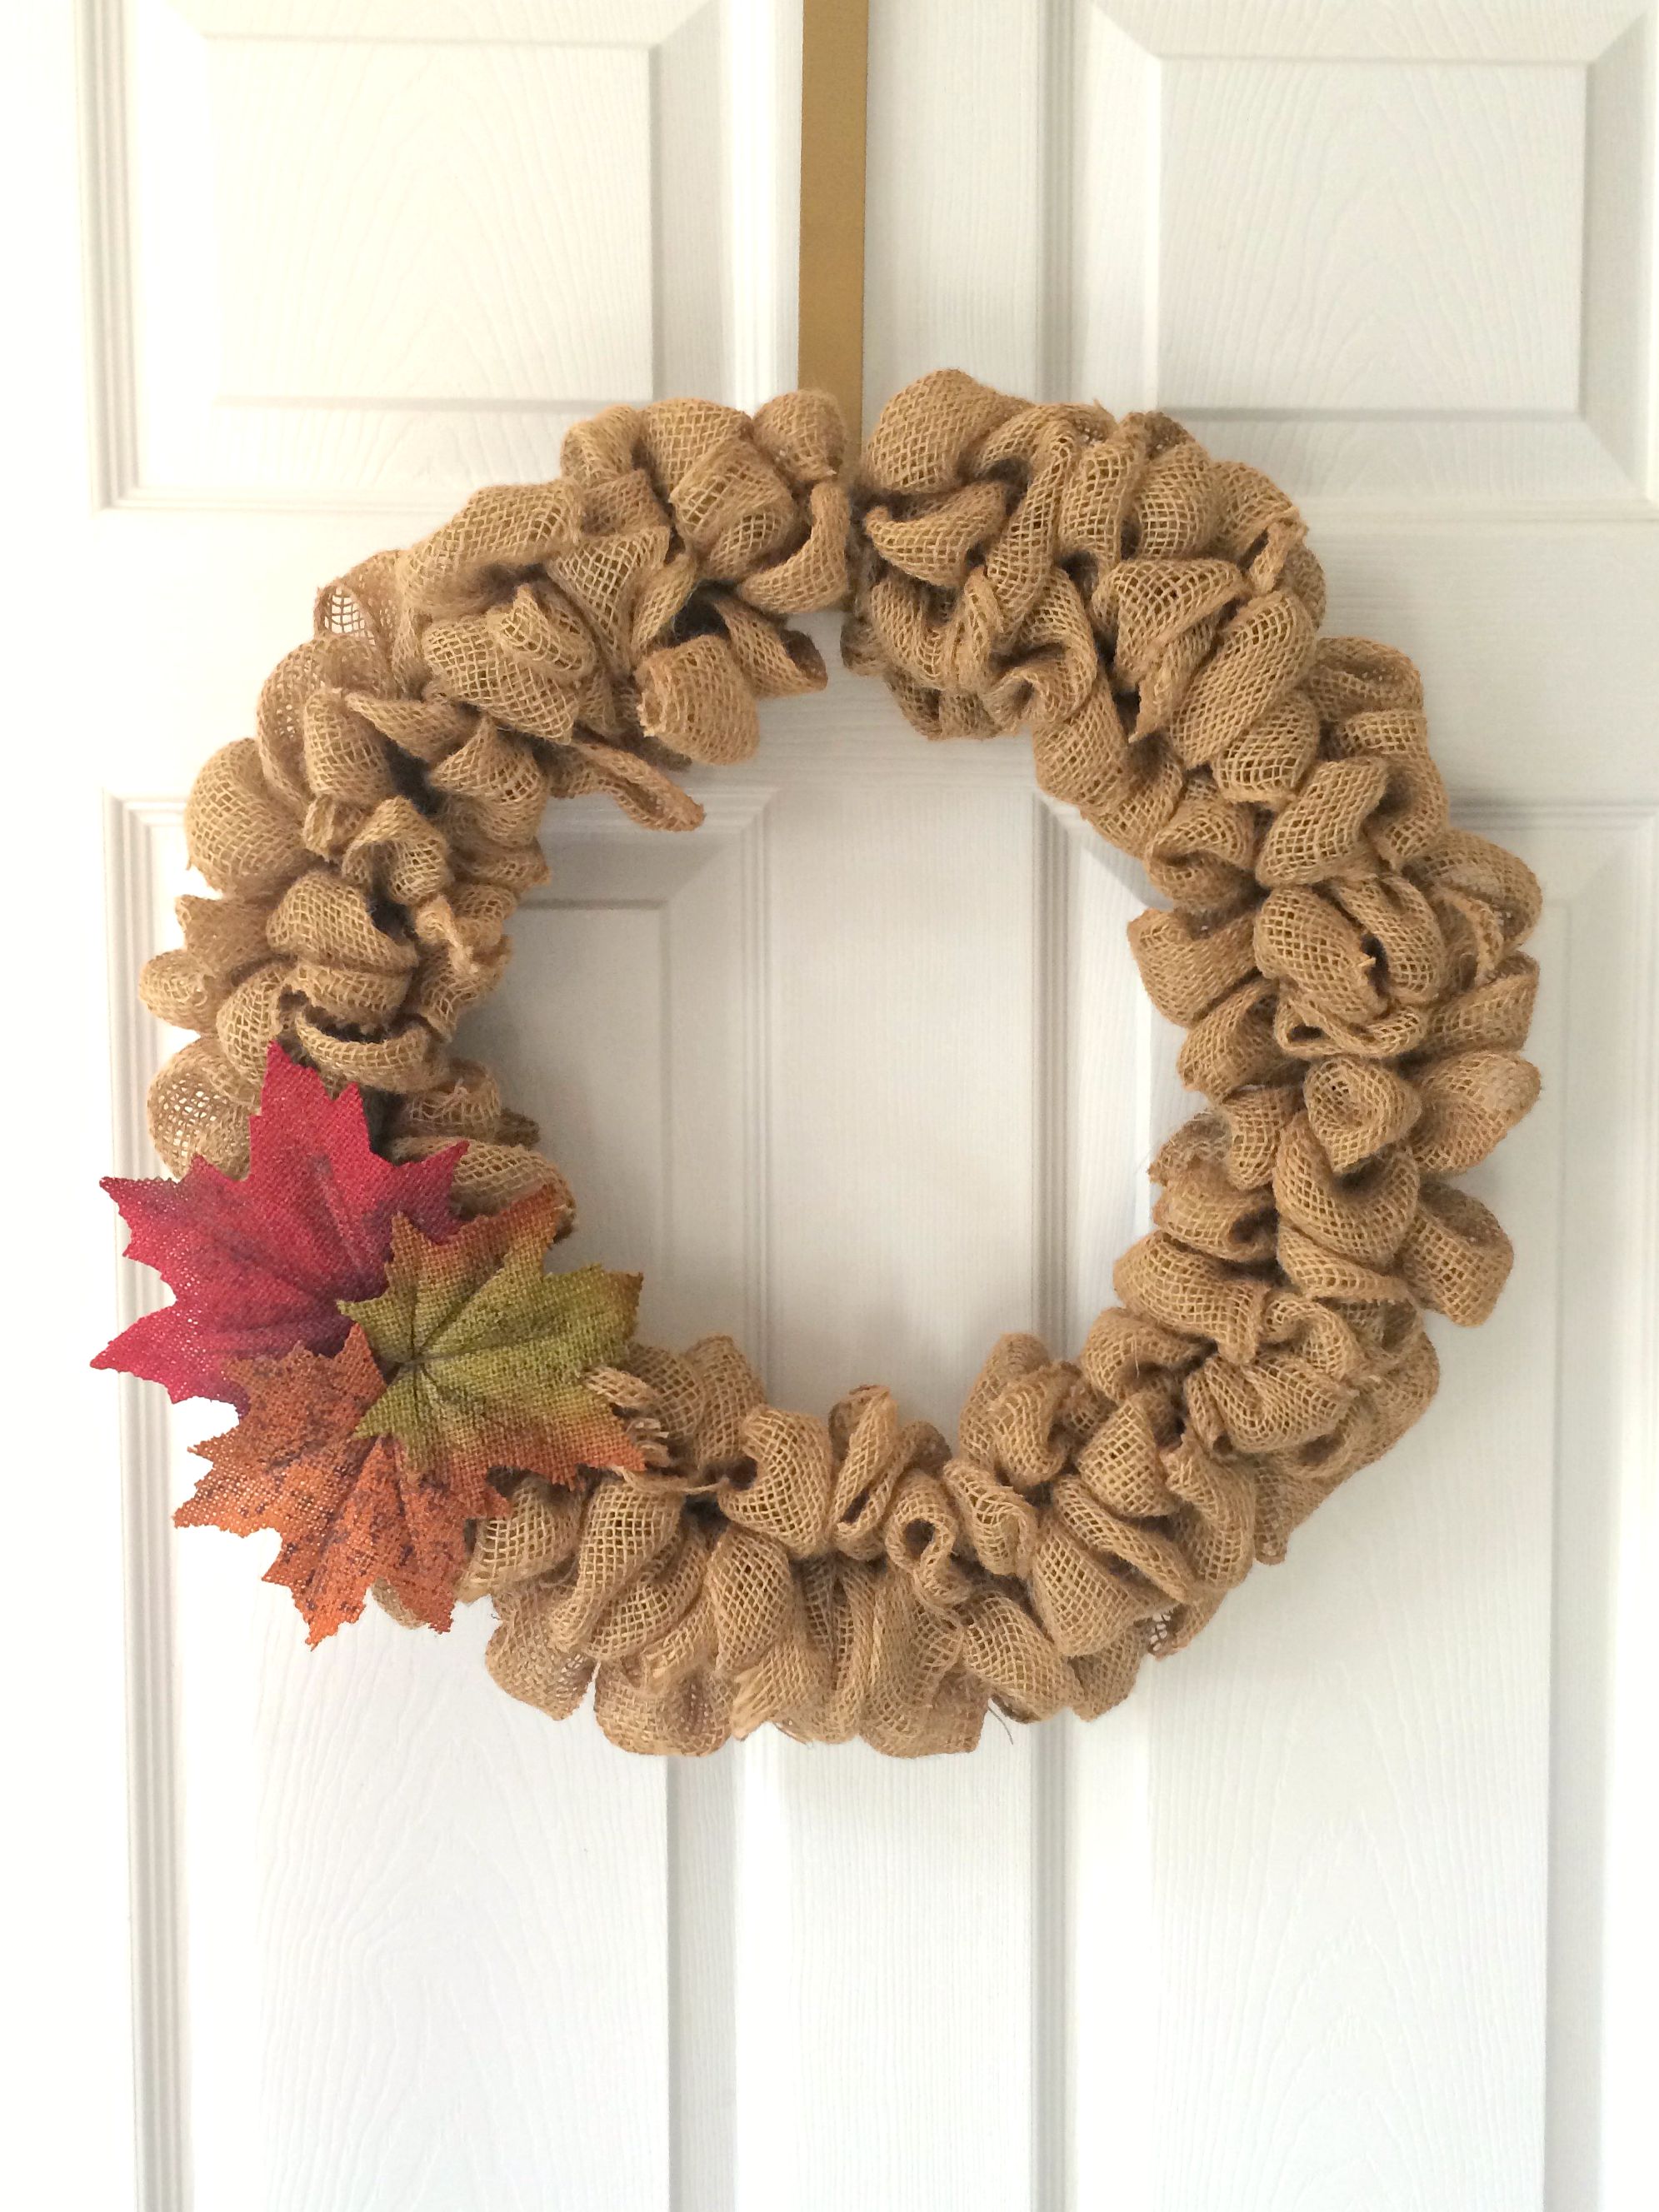
Hang it on your door and (not so) secretly smile to yourself every time you walk through the door! P.S. I save all sorts of fun fall projects, decor inspiration, and recipes over on my fall Pinterest board. Are you following me there yet?
You Might Also Like…


I love wreath making! This past weekend I even participated in a sign make and take class. We made the most adorable door tags that say “give thanks”. But now I feel like this wreath would look AWESOME hanging in my hall way.
Trisha @ The Ham & Cheese Of It recently posted…The Carson’s Story: Praying for In Vitro – A Gofundme Project
That’s awesome! I am not good at lettering and handwriting so I always admire women who can do cute signs and things like that. I bet it looks super cute!
My mom just made one of these last week. They are so cute! Thanks for the tutorial! I wasn’t sure how she did it!
Kristin C recently posted…Apple Picking and an Update
It’s so much easier than it looks! I hope you’ll be able to give it a try 🙂
What width of burlap did you use,and how much. Also what was the size of the wrath form.Its beautiful.
Hi Bridget! I feel horrible but I actually don’t remember…I’m going to guess from the picture the burlap was about 3-5 inches wide and the wreath frame I think was 8-10 inches. Maybe 12? Luckily you can do any size and just tweak things a little to make it work. I hope that helps!
Gee … maybe even I can do this!
Love the final touch of those leaves, girl. Just too fun!
;-}
Linda Stoll recently posted…Who Would Have Guessed?
Thanks, Linda! 🙂
It looks really cute! I need to find some burlap!
Emilie recently posted…My Number One Tip to Save Money
Thanks, Emilie! 🙂
That looks great! I made one a lot like this recently. I kind of wish I had used a smaller frame though. http://mrsmaugeri.blogspot.com/2015/09/diy-fall-burlap-wreath-tutorial.html
Thanks, Charlene! Yours is so cute too. Love the pumpkin! Thanks for stopping by!
This wreath is so great! I love burlap wreaths they are so pretty and those leaves make it very perfect for fall. Would look great on our front door!
Emily recently posted…DIY Fabric Pumpkins
Thanks, Emily! 🙂 Me too!
This is so cute! I always see gorgeous wreaths like this at the store but they are so much money! Nice to know it’s possible to create your own without having to splurge. Definitely trying this out this fall!
Melissa recently posted…How to Balance Busy Times with Business Lulls as a Freelancer
Thanks, Melissa! This one is so cheap and easy to make. I hope you’ll be able to give it a try!
This is adorable and exactly the kind of DIY project I like: just a few materials, fairly easy, pretty much foolproof. I’m too perfectionistic to really enjoy crafting, but this definitely seems like something even I could handle. I love that you could also change out the decorations by season and reuse the wreath!
Brittany Bergman recently posted…Can We Stop Body Shaming Ourselves?
Ha I’m a perfectionist to so crafting can be challenging at times, but I think it’s so good for me! And that is 100% true…I totally take the leaves off and add other decorations for other seasons! 🙂 Good thinking!
This is a great wreath tutorial, Lauren! I want to make one for our apartment. I love the fall season and still need to decorate for it!
Summer @ Coffee With Summer recently posted…Empty Encouragement VS. Intentional Investment
I love this! It looks easy enough for me to make it. Where did you get your supplies?
liz jo @ sundays with sophie
Liz Jo recently posted…10 tips about love
Hobby lobby! It’s the best. And they always have great sales! 🙂
This looks both beautiful AND achievable!
Daisy @ Simplicity Relished recently posted…7 Foolproof Secrets To Decorating With Plants
I love the leaves, what a pretty touch! I know the perfect spot for a wreath like this. I may have to try it out!
Megan Gonzalez recently posted…Easy French Pedicure
This is so pretty! I love crafting, but I’m not always very good at it. This seems a little complex for my basic crafting skills but it’s just so pretty I might need to give it a go!
Hannah recently posted…Liebster Award
This is so cute! I love how simple, yet still extremely festive this wreath is!
Amanda @Blissful Gal recently posted…My Anxiety + What Anxiety Feels Like
I always wondered how to get them so fluffy! Thanks for sharing this tutorial!
Jes @ Mommy Envy recently posted…Living Room With Coral Accents – Mood Board
This wreath is so adorable! I have never made a wreath before (I have tried) but I may have to try making this one! Thank You for sharing!
Mistle recently posted…Fall Shows I’m Looking Forward To Watching
Um, this is completely adorable!
Bri recently posted…October Goals
This is so awesome! I’d love to make my own wreath!
Rachel recently posted…Open Enrollment Season: Choosing Your Insurance Plan
Thanks, Rachel! I hope you do!
I love this! I always wanted to make a wreath, but I never really knew how, but you make it look super simple!
Thanks, Kara! I hope you’re able to give this one a try!
I love the wreath. I have been wanting to make one for so long and your tutorial is wonderful!
Ashley recently posted…Endless Possibilities (October Goals)
Thanks, Ashley! I’m glad you like it!
This has been on my “want to DIY” list forever!!! Thanks for the steps, I will definitely be making one of these beauties this fall!!!!!
Laura recently posted…Friday Wine-Down
So cute! I love the simplicity of it. The burlap leaves make it perfect!
Vineta @ The Handyman’s Daughter recently posted…Cut Perfect Lines Every Time with a DIY Circular Saw Guide
Oh my! I love it! I was literally thinking that I needed to make a wreath earlier today. I will definitely be trying this. You made it look so easy, thanks!
Amanda Rinehart recently posted…Painting with Science, Kid’s Craft
woow. that is cool 🙂
You are welcome to join my BlogParty
SATURDAY SHOW OFF
Hugs from Håkan in Sweden
I have made three of the wreaths, two of them were the heart shaped ones for my granddaughters. I had been messing with them for ever trying to make them look like I wanted them and this really worked for me. The heart shaped wreaths done in the mess did not work they didn’t turn out in the pretty shape I wanted. This process does. Thanks so much. They have their wreaths hanging on their bedroom door in their new home.
Thanks again? Pam