There’s something so pretty and cozy about a front door with a wreath on it. I’ve always admired women who can whip up beautiful, colorful wreaths but felt a little nervous to try something that seemed so complex and “advanced” for a beginning crafter like me.
Last fall, I finally got brave enough to try my hand at a burlap bubble wreath, following some tutorials I found online (which I’ve since gotten a new computer and lost the links to!). I tied on some burlap autumn leaves from World Market using pipe cleaners and hung the whole thing on our apartment door. Every time I came home it made me smile a little to see my own handiwork looking so cute on our door!
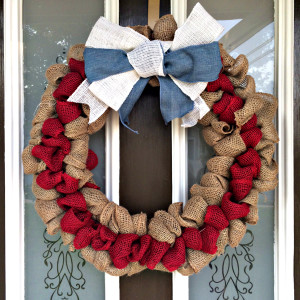
Life got busier over Christmas and we moved into a new house in January. I’ve been dreaming of wreaths to adorn the door of our new house for a while but focused more on some other projects. I’ve seen so many cute tutorials and wreaths online, but in the spirit of being creative and learning to trust my own crafting vision and abilities…I just decided to play around and make something up! I went to Hobby Lobby and explored for a while (this is one of my favorite pastimes. Hubby is not as big of a fan of this as I am). I came with a few bags of materials, knowing I could return some if I didn’t end up using them. And after lots of playing around (see the process above), I love what I came up with!
This was super easy to make and a fun project that can be switched or change to match the season or holiday. Even if you’re not a big crafter, this project is a great place to start!
How To Make A Patriotic Burlap Wreath
1. Assemble Your Materials
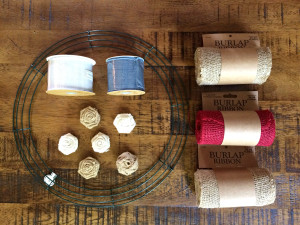
If you’re like me, you might approach projects like this with a ton of different supplies and play around until you find something like. I bought everything from Hobby Lobby that you see in the picture below, even though I ended up deciding not to use the little flowers. But it’s all part of the creative process, you know? I did end up needing more burlap then this…I used about 3 rolls of the tan burlap and 1.5 of the red. How much you need will depend on how big your wreath is, so I would plan on getting some extra just in case.
2. Tie the burlap to the wreath frame.
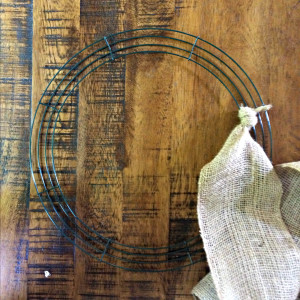
Tie the first color of burlap in a knot around one of the outer rings. The knot should face toward the back of the wreath so you can pull the burlap through the front.
3. Pull the tan burlap out of the wreath frame to create a “bubble” or “loop.”
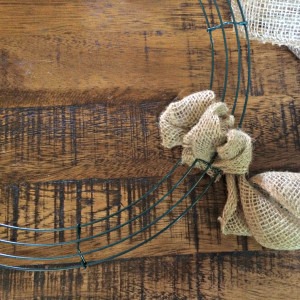
Reach your fingers through the wires to pull through one small loop. Tug and pull at the burlap until it forms a pretty little loop (how big you want it is up to you!). After you pull the loop through, twist the fabric below it once or twice before making another loop through the next wire gap. This twisting is what helps keep the loops in place! I started with three loops of the first color just to get things going.
4. Start alternating the colors.

Tie the second color (red) next to the new burlap loops and pull it up through the middle wire ring to create your first red loop. Pull two more burlap loops through the wire frames (one in the inner ring and one in the outer) and then pull the red up through the middle ring between these two loops. The whole time, keep trying to cross the tan burlap over the red in the middle in the back of the wreath to keep the red in place and keep it all secure. This won’t make sense until you’re actually sitting there with the wreath on your lap, but I promise it does! It reminds me of doing a french braid…you have to use every finger to keep all the loops in place but after a few minutes you’ll start to get into a rhythm.
5. Repeat this process over and over!
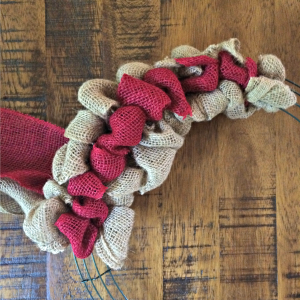

When you get to the every end, tie the remaining burlap in a knot on the back of the wreath and cut off any extra. This is one of those craft processes where you have to let go of perfectionism and just play (It’s hard for me too, y’all. I feel your pain.) Weave the burlap in and out so there are loops across each piece of the wire wreath hanger (should be about three loops before you pause for your second color. When one roll ends, tuck the last little piece into the wire or tie it up with a pipe cleaner and then tie the start of a new roll to the next open wire space and keep on looping!
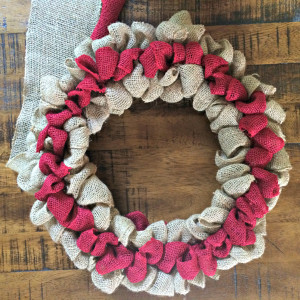
6. Add some sort of bow or garnish to finish it off.

When you finish, cut off any extra burlap or tuck it into the wire in the back. Now it’s the fun (or if you’re me, semi-stressful part). You can add any sort of extra decoration to finish it off. I originally got some burlap flowers, but ended up just liking a simpler blue and white bow like this one so left it at that!
7. Enjoy the Finished Product!
Hang it on your front door and (not so) secretly smile to yourself every time you walk through the door! 
What kinds of 4th of July wreaths have you made? Feel free to link up to any fun projects or tips you have from past wreath-making experiences!

You might also like…



Love this! Great idea to put together a wreath this way!
Jennifer recently posted…12 Patriotic Projects to Celebrate the 4th of July
Thanks, Jennifer! 🙂
LOVE this wreath and your blog! Love the creativity here and your blog captures a riveting life journey anchored in Jesus! Loving it! Following you know and looking forward to seeing more great things! 🙂 Found you on the handmade hangout!
Cathy
Cathy, those are such sweet, encouraging words! That is exactly my heart for this space…to capture faith and creativity and all the ways those things intertwine in our stories. Thanks for stopping by and leaving such great encouragement! 🙂
Super cute, Lauren! I might have to give this a shot. Our wreath could use a little update, or at least a friend to change things up 🙂
Kelsie Kleinmeyer recently posted…Weakness and Worth: An Honest Reflection
Thanks, Kelsie! 🙂 It’s super easy and I bet it would look super cute on your front door!
I’m sooo in love with is wreath!!! Very detailed tutorial!! I would love it if you would submit this post to our blog! We feature great tutorials and link back to you to read the full post!! Have a great weekend!
Denise/DIY Crush recently posted…Free Girls Polka Dot Peplum Sewing Pattern – Newsletter Exclusive
Wow, thanks Denise! 🙂 I’m so glad you liked it. I just went over and submitted it to the site so you should see it pop up soon! Thanks so much and please let me know if you have any questions at all!
Lauren, this wreath is fantastic! Perfect for the 4th! Thanks so much for sharing at Dream. Create. Inspire. Link. Pinning:)
Thanks, Tara! I’m so glad you liked it! And thanks for the Pinterest love 🙂
This wreath is super cute! I’m pinning it to my patriotic pins board.
Navy Wifey Peters @ The Submarine Sunday Link Party
T’onna @ USS Crafty recently posted…Submarine Sunday #123
Thanks, T’onna! I’m so glad you liked it and appreciate the pinning. Can’t wait to go check out the rest of your boards!
What a darling wreath. Love it!
Thanks, Brooke!
Cute wreath! Thanks for joining Home Sweet Home!
Thanks, Sherry!
This looks so cute and easy! Which, let’s face it, is the perfect combination!
Ha I totally agree with you, Rachel. 🙂
Love it! Featuring this evening on The Painted Drawer Link Party! Thanks for sharing! Have a great Fourth of July!
Suzanne recently posted…Connected! The Painted Drawer Link Party
Thanks, Suzanne! So exciting 🙂
One of these days I’m going to make one of these. They are a great look.
Thanks for the step by step tutorial.
This is so cute, and I love the bow!
Ricki Jill Treleaven recently posted…Literary Friday: American Lit
Thank you! 🙂
how many folds did you do in each section. I making one now and I think I may have made to many for each section because it looks so right and is hard for me to fluff out.
Hi Nickey! Sorry I’m responding a little late. I think I just did one little loop between each two wires as I worked back and forth across the frame. So something like 3-4 loops across the frame! I hope your wreath turned out beautifully!